Website Construction Process
Overall process description
- Create static pages for the website.
- Create a site in the backend, and establish publishing channels.
- Plan the structure of categories and the organization of content.
- Importing static pages into the publishing channel directory.
- 【Key pointsFind an AI that can be used to generate the official website documentation. Inform the AI about the source of the page content, and let the AI create the necessary templates based on the documentation.
- Publish website to generate static files.
Create a site
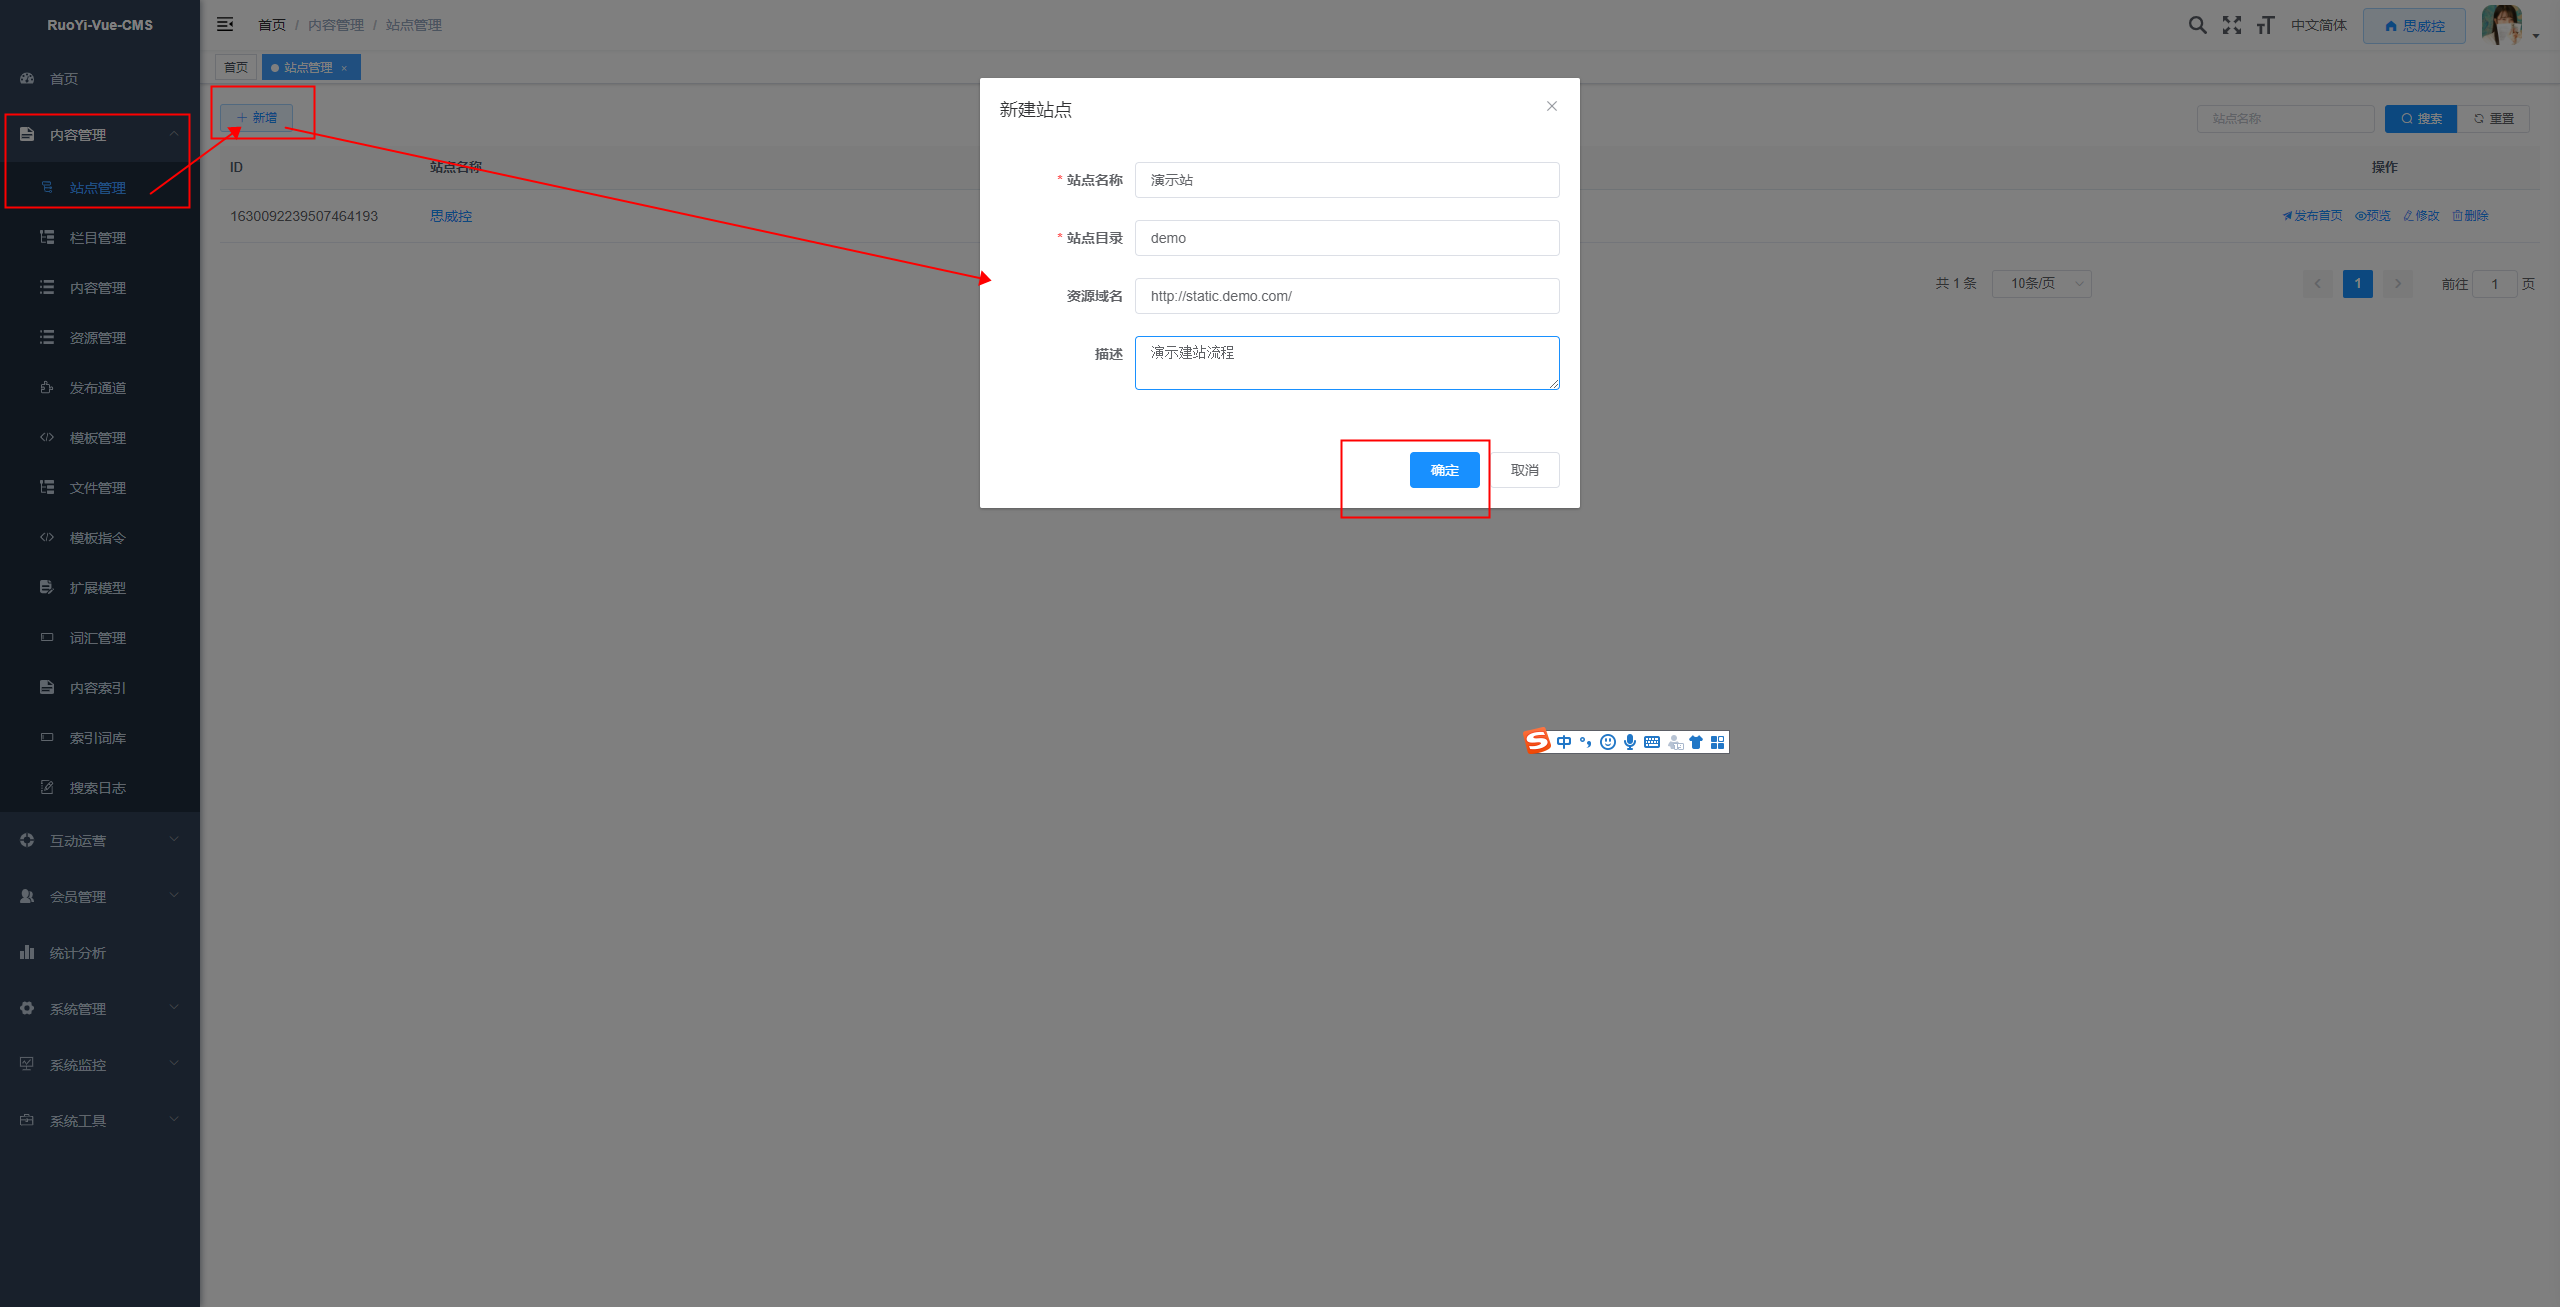
Enter Content Management > Sites Menu, click Create Select the button, fill in the basic information of the website, and click. Confirm Press the button to complete site creation.
Field Description: - Site Directory: The directory where site files are stored. This directory is created based on the chestnut.cms.resourceRoot configuration.
For example, if the configuration is set as follows: chestnut.cms.resourceRoot=D:/chestnut/wwwroot_release/, then the directories will be created during site creation: D:/chestnut/wwwroot_release/demo/.
- Resource Domain Name: This domain name is used to independently configure the access to resource files uploaded by the site (such as images and videos).
Switch sites
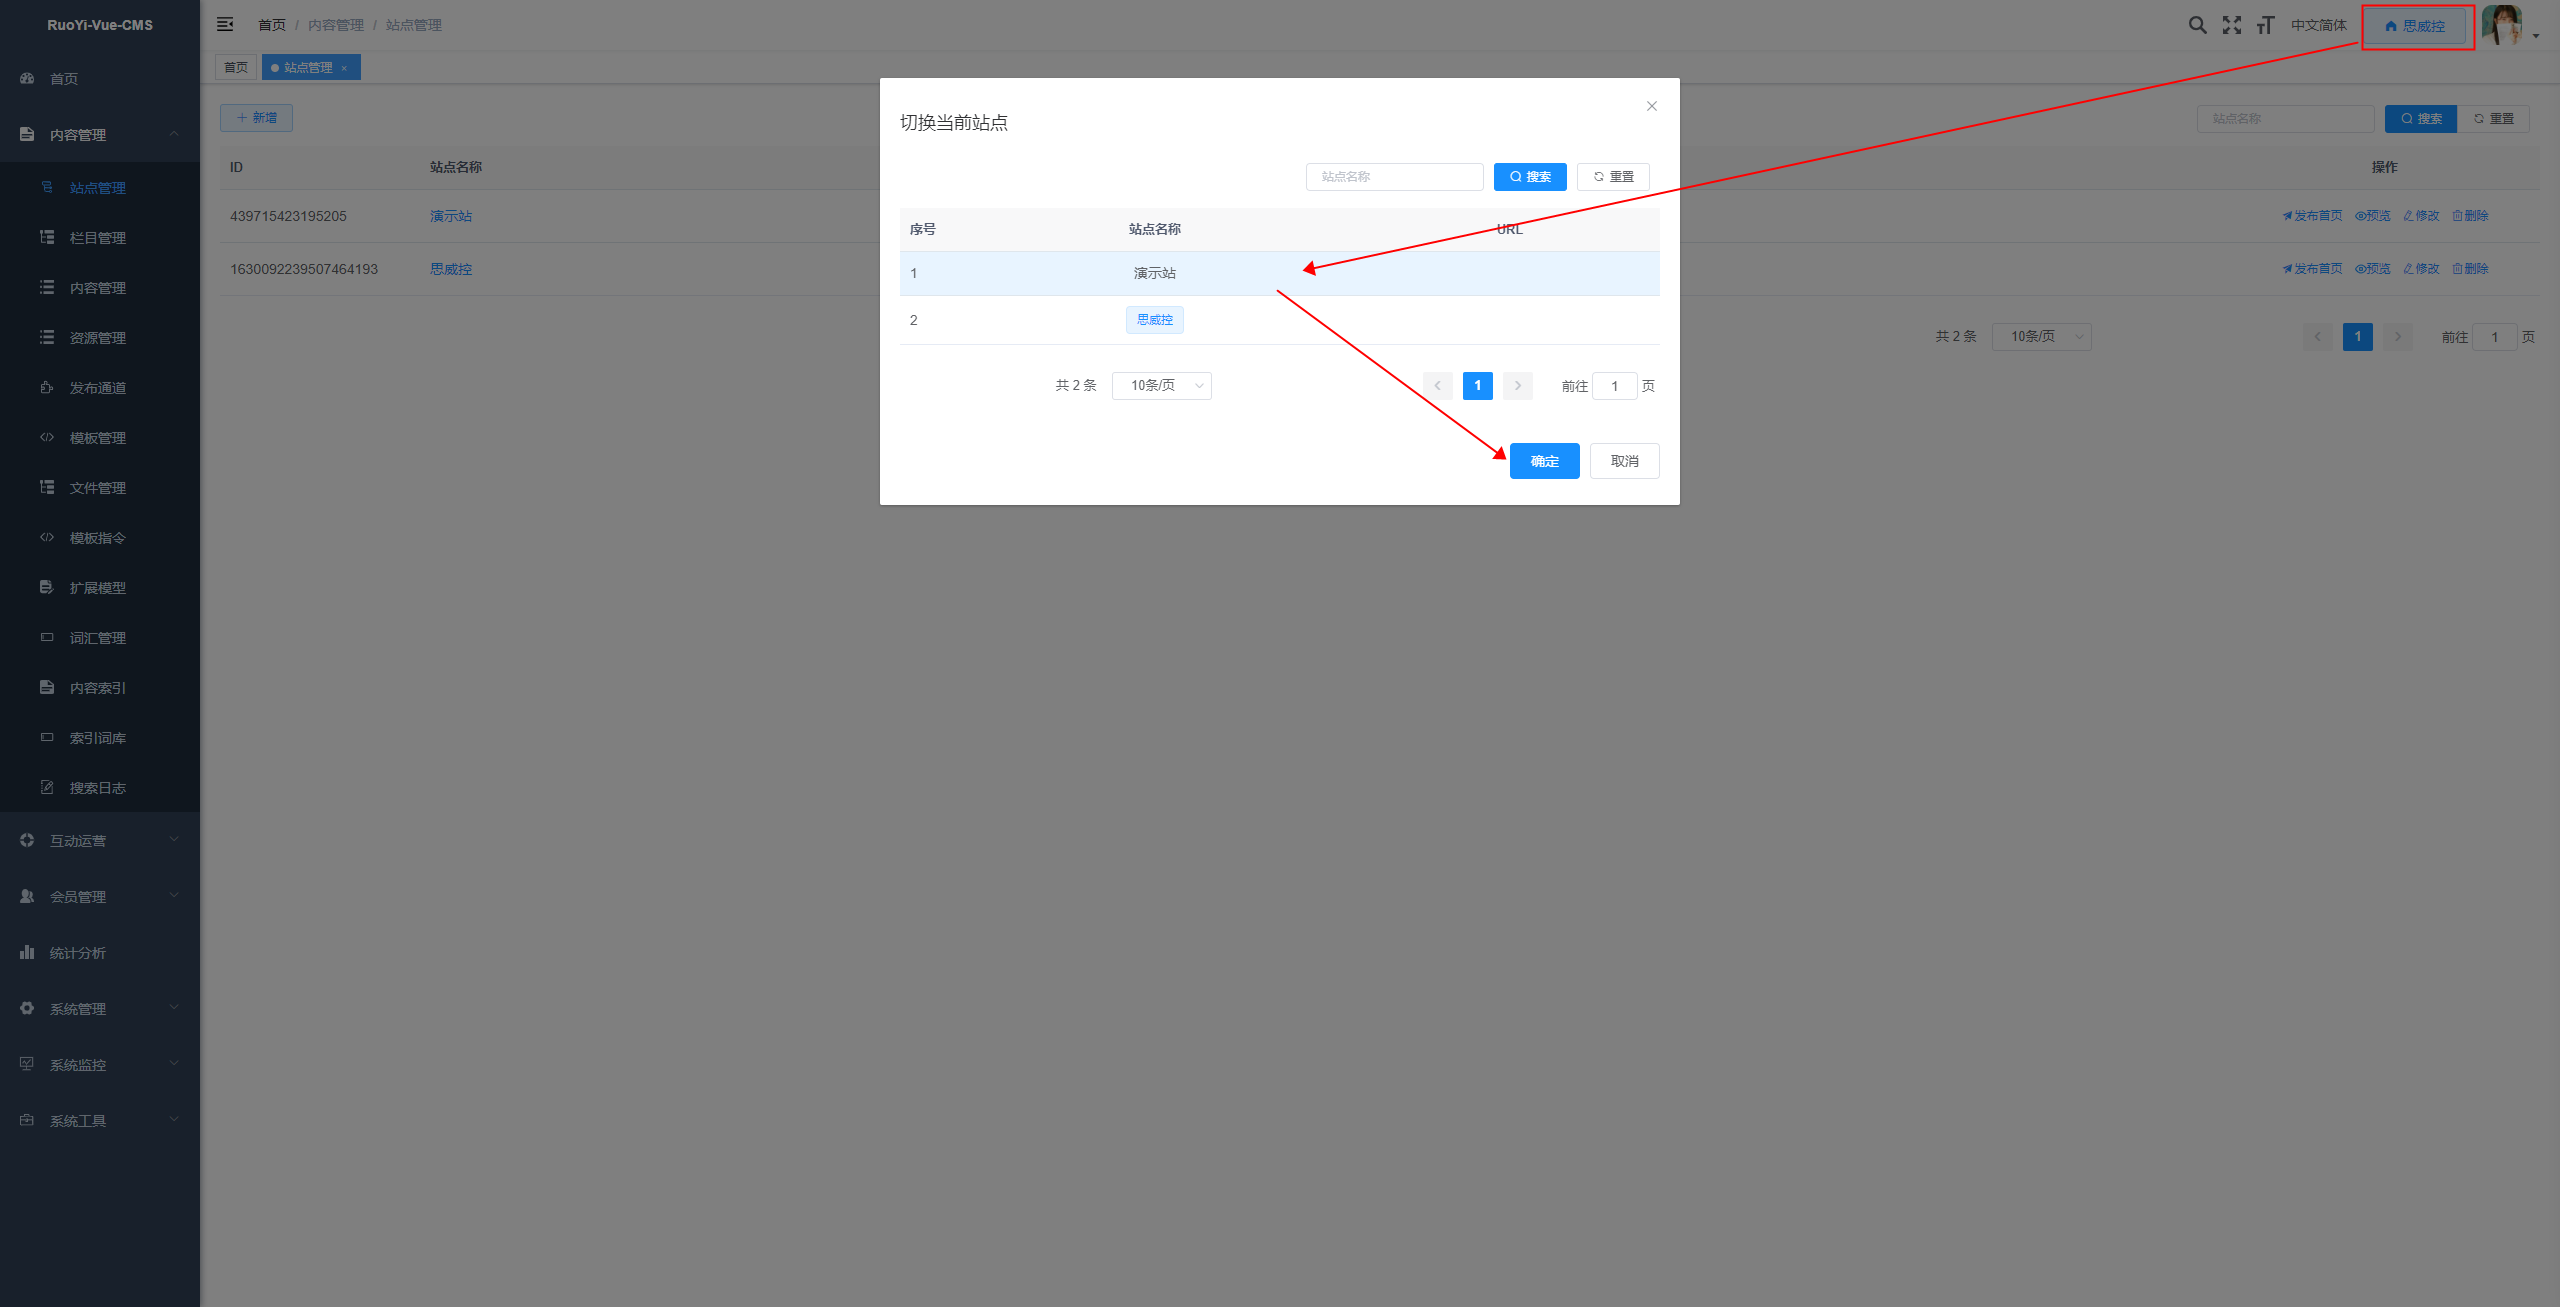
Switch to our newly created site in the upper right corner. Double-click on the demo site we just created, or select it and click "OK" to switch sites.
Create a publishing channel
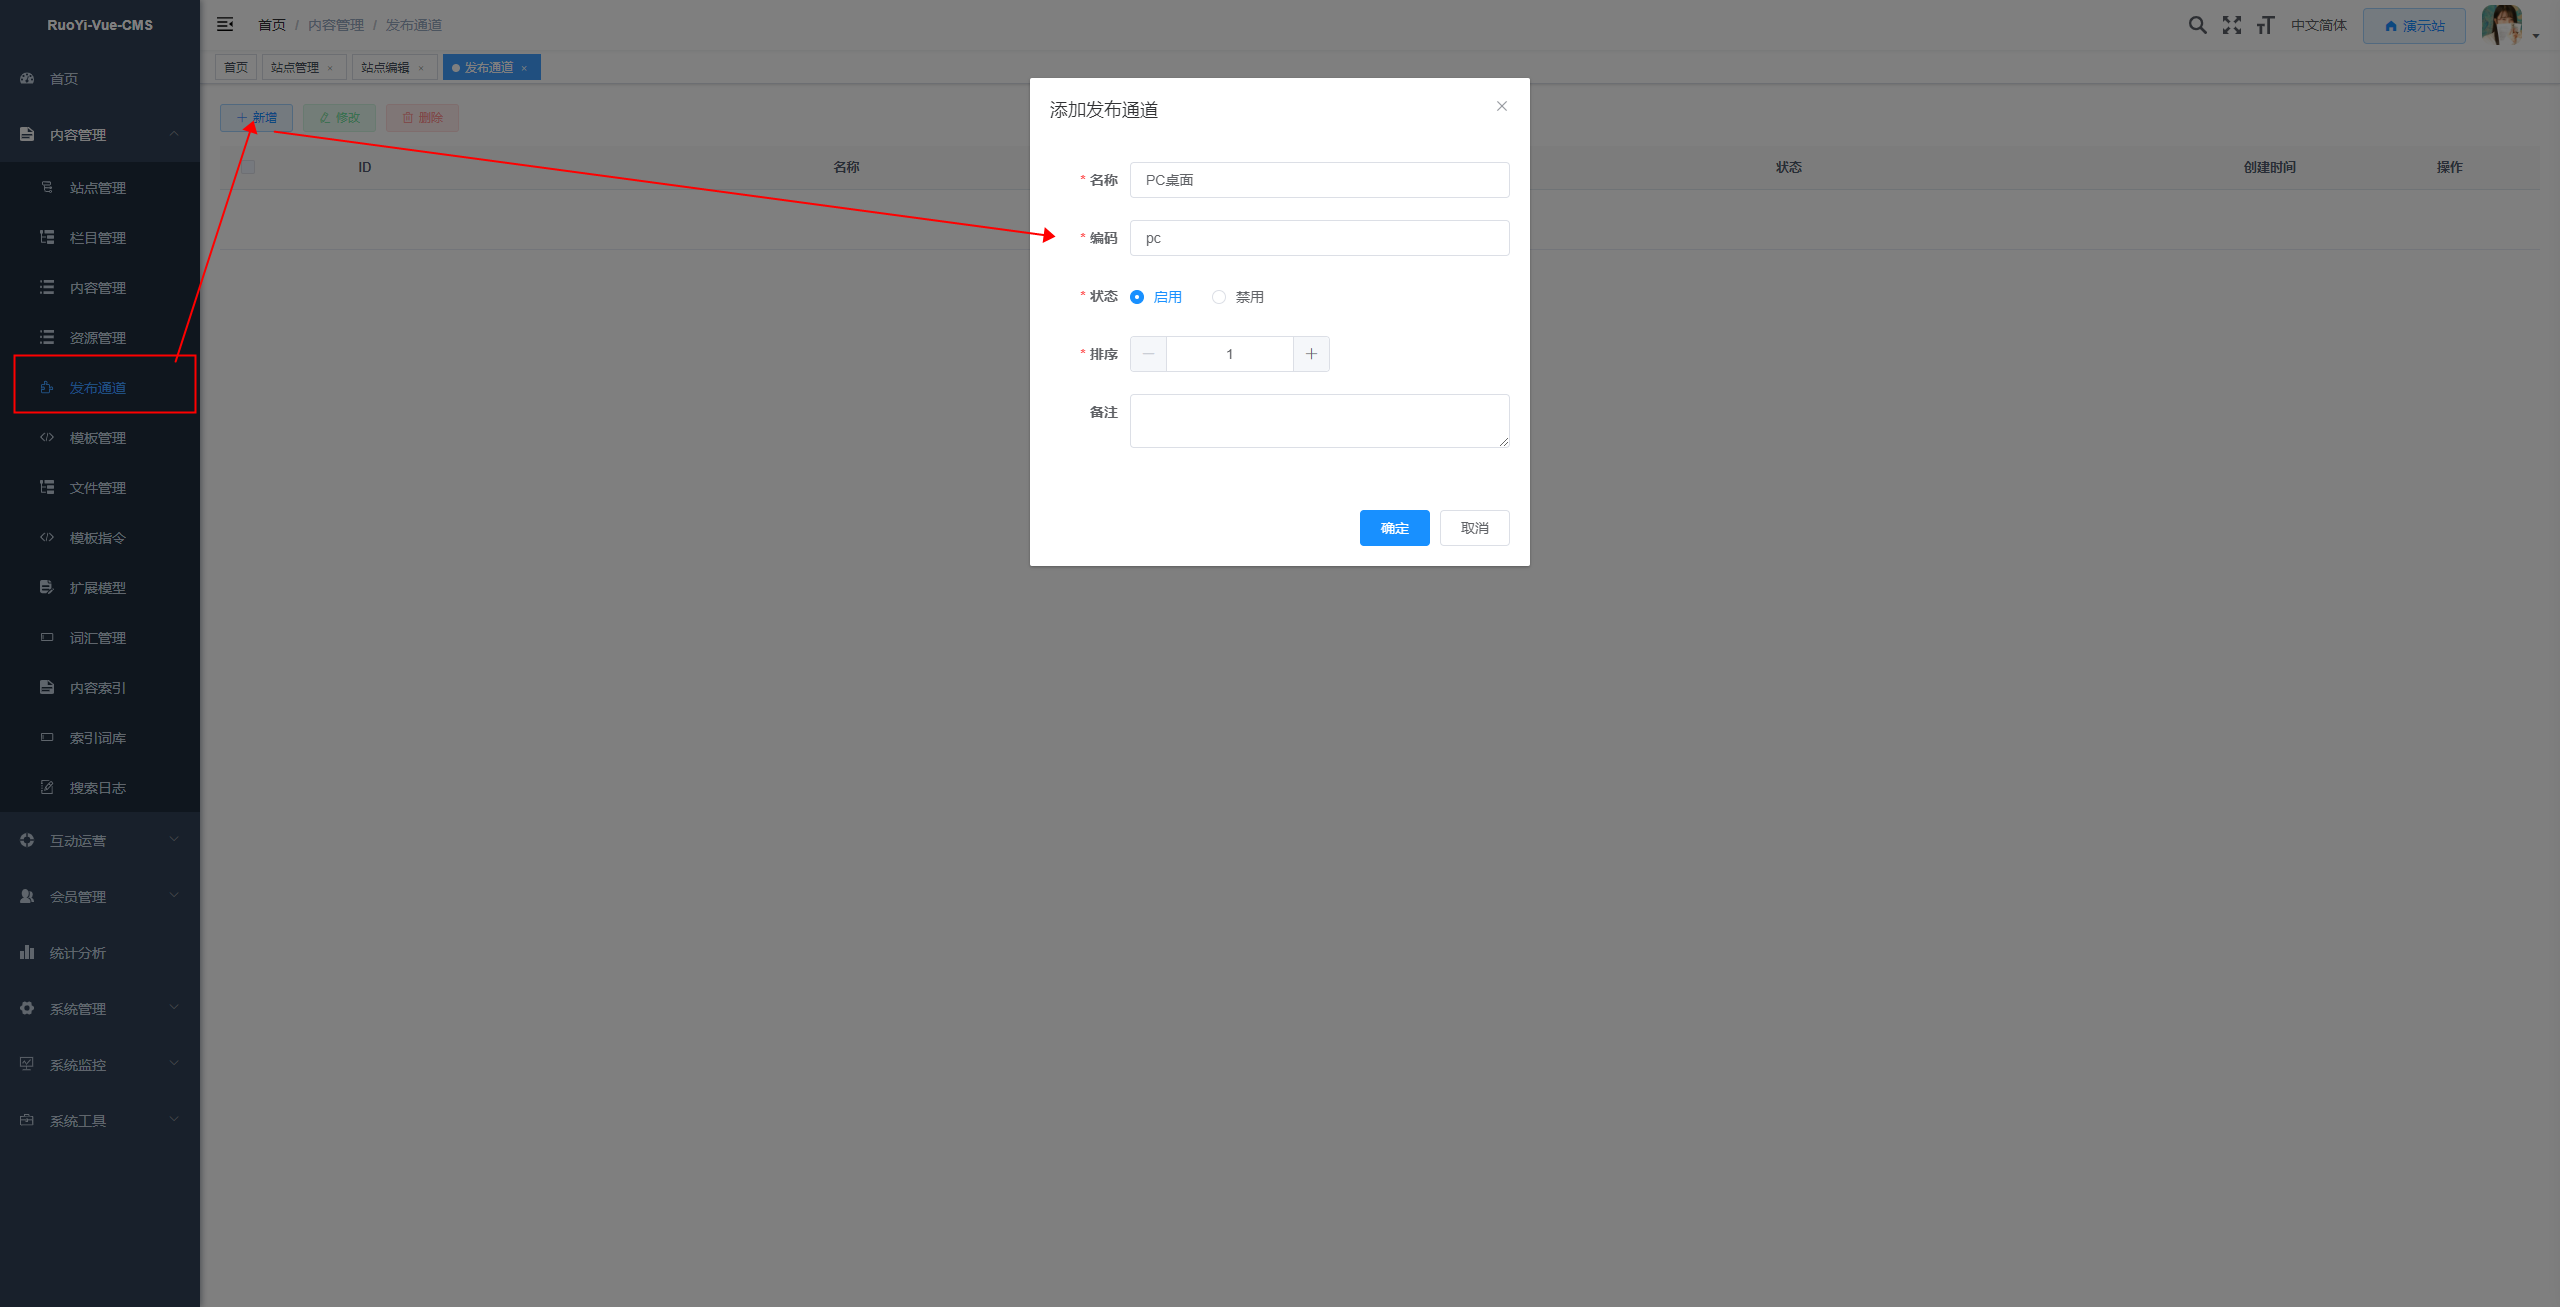
Enter Content Management > Publishing Channels Menu, click Create Button, create a publishing channel. (Must be created after switching to the correct site.)
Explanation: The “release channels” refer to the directories where static files of the website are stored. Multiple release channels can be created in order to meet the requirements of different display formats on various devices. For example, one set of templates can be used for PC desktops, another set for mobile phones, and yet another set for mobile tablets. Additionally, a set of static files in JSON format can be created, which can be used by native apps to retrieve content data.
Directory structure of publishing channels
When creating a publishing channel, the system will chestnut.cms.resourceRoot Create a site publishing channel directory in the configuration directory to store publishing channel templates and related static resource files. Let's proceed. Content Management > Files Menu. To view information related to the site’s files, please refer to the figure below:
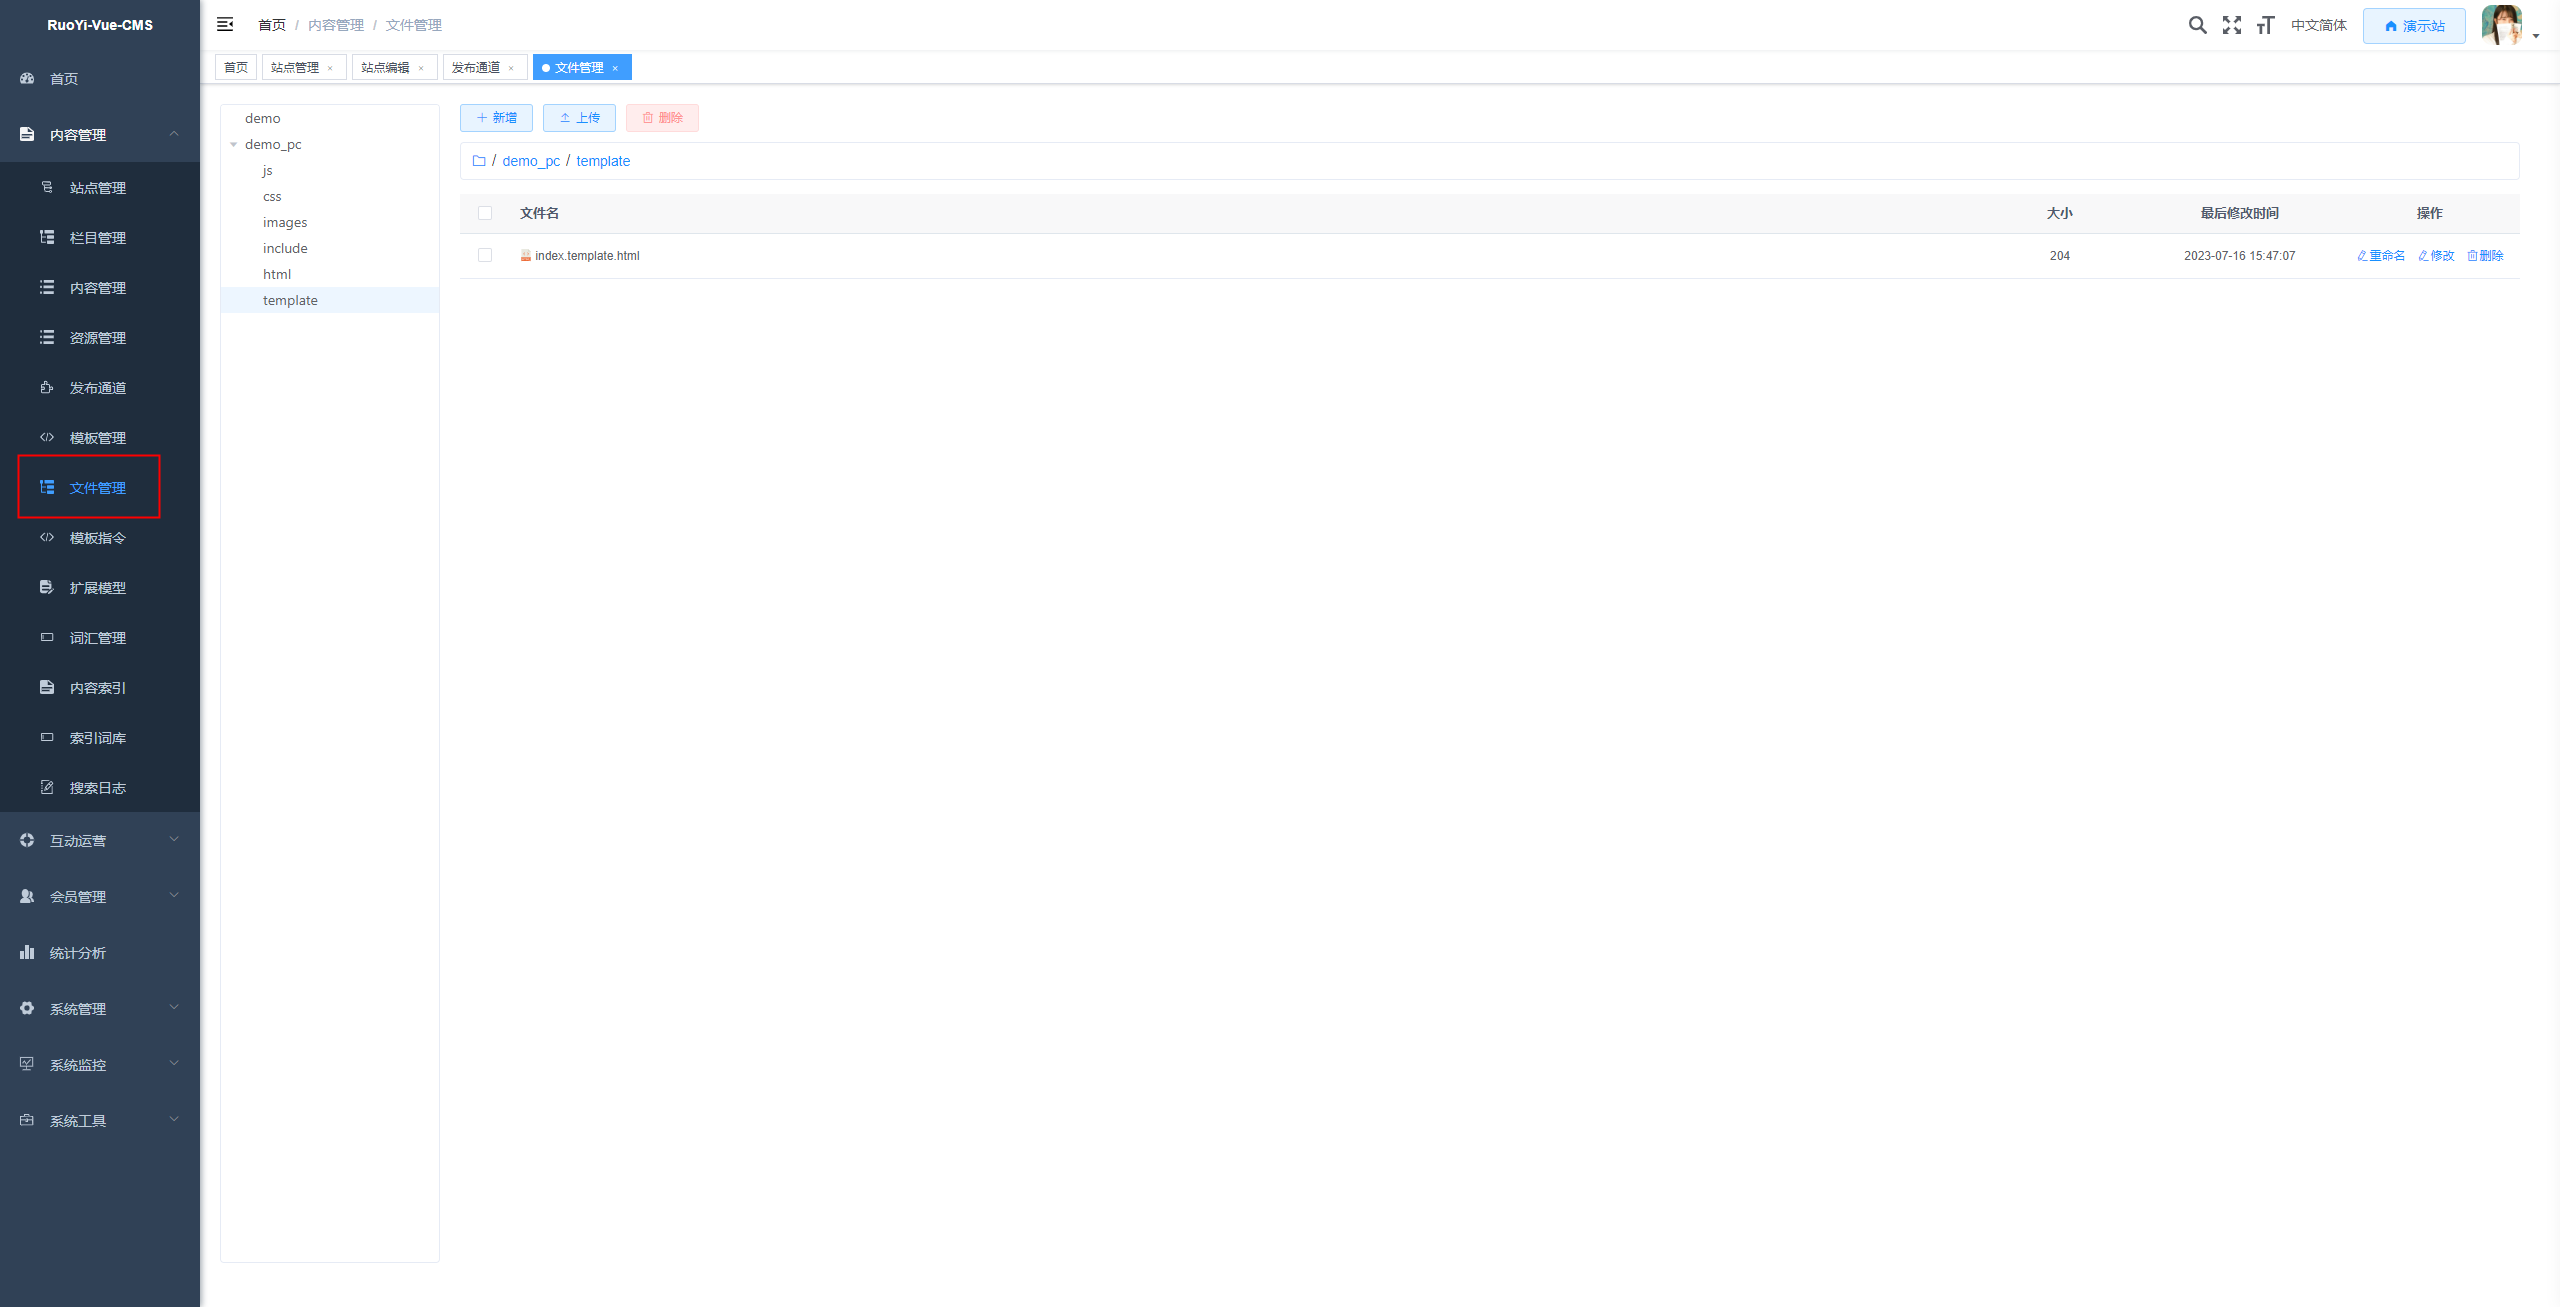
Currently, there are 2 top-level directories related to this site: - The ChestnutCMS is a content management system for websites. It mainly stores files uploaded to the site within this directory. - The “demo_pc” is the directory we have created for storing the release channels. Within this directory, there are already some directories that are automatically created by the system. 1. template The directory is a fixed location for storing page templates. All page templates for the publishing channels must be placed in this directory. When creating a publishing channel, the system will create a default homepage template in this directory. index.template.html; 2. include The directory is a fixed location where static files generated by the template are stored; 3. There are no strict requirements for the remaining directories. Generally, we place the static page files in the html directory, and the corresponding JavaScript, CSS, and image files in their respective directories.
Directory structure of resource files
We tried to do this. Content Management > Resources Upload an image under the menu. As shown in the following figure:
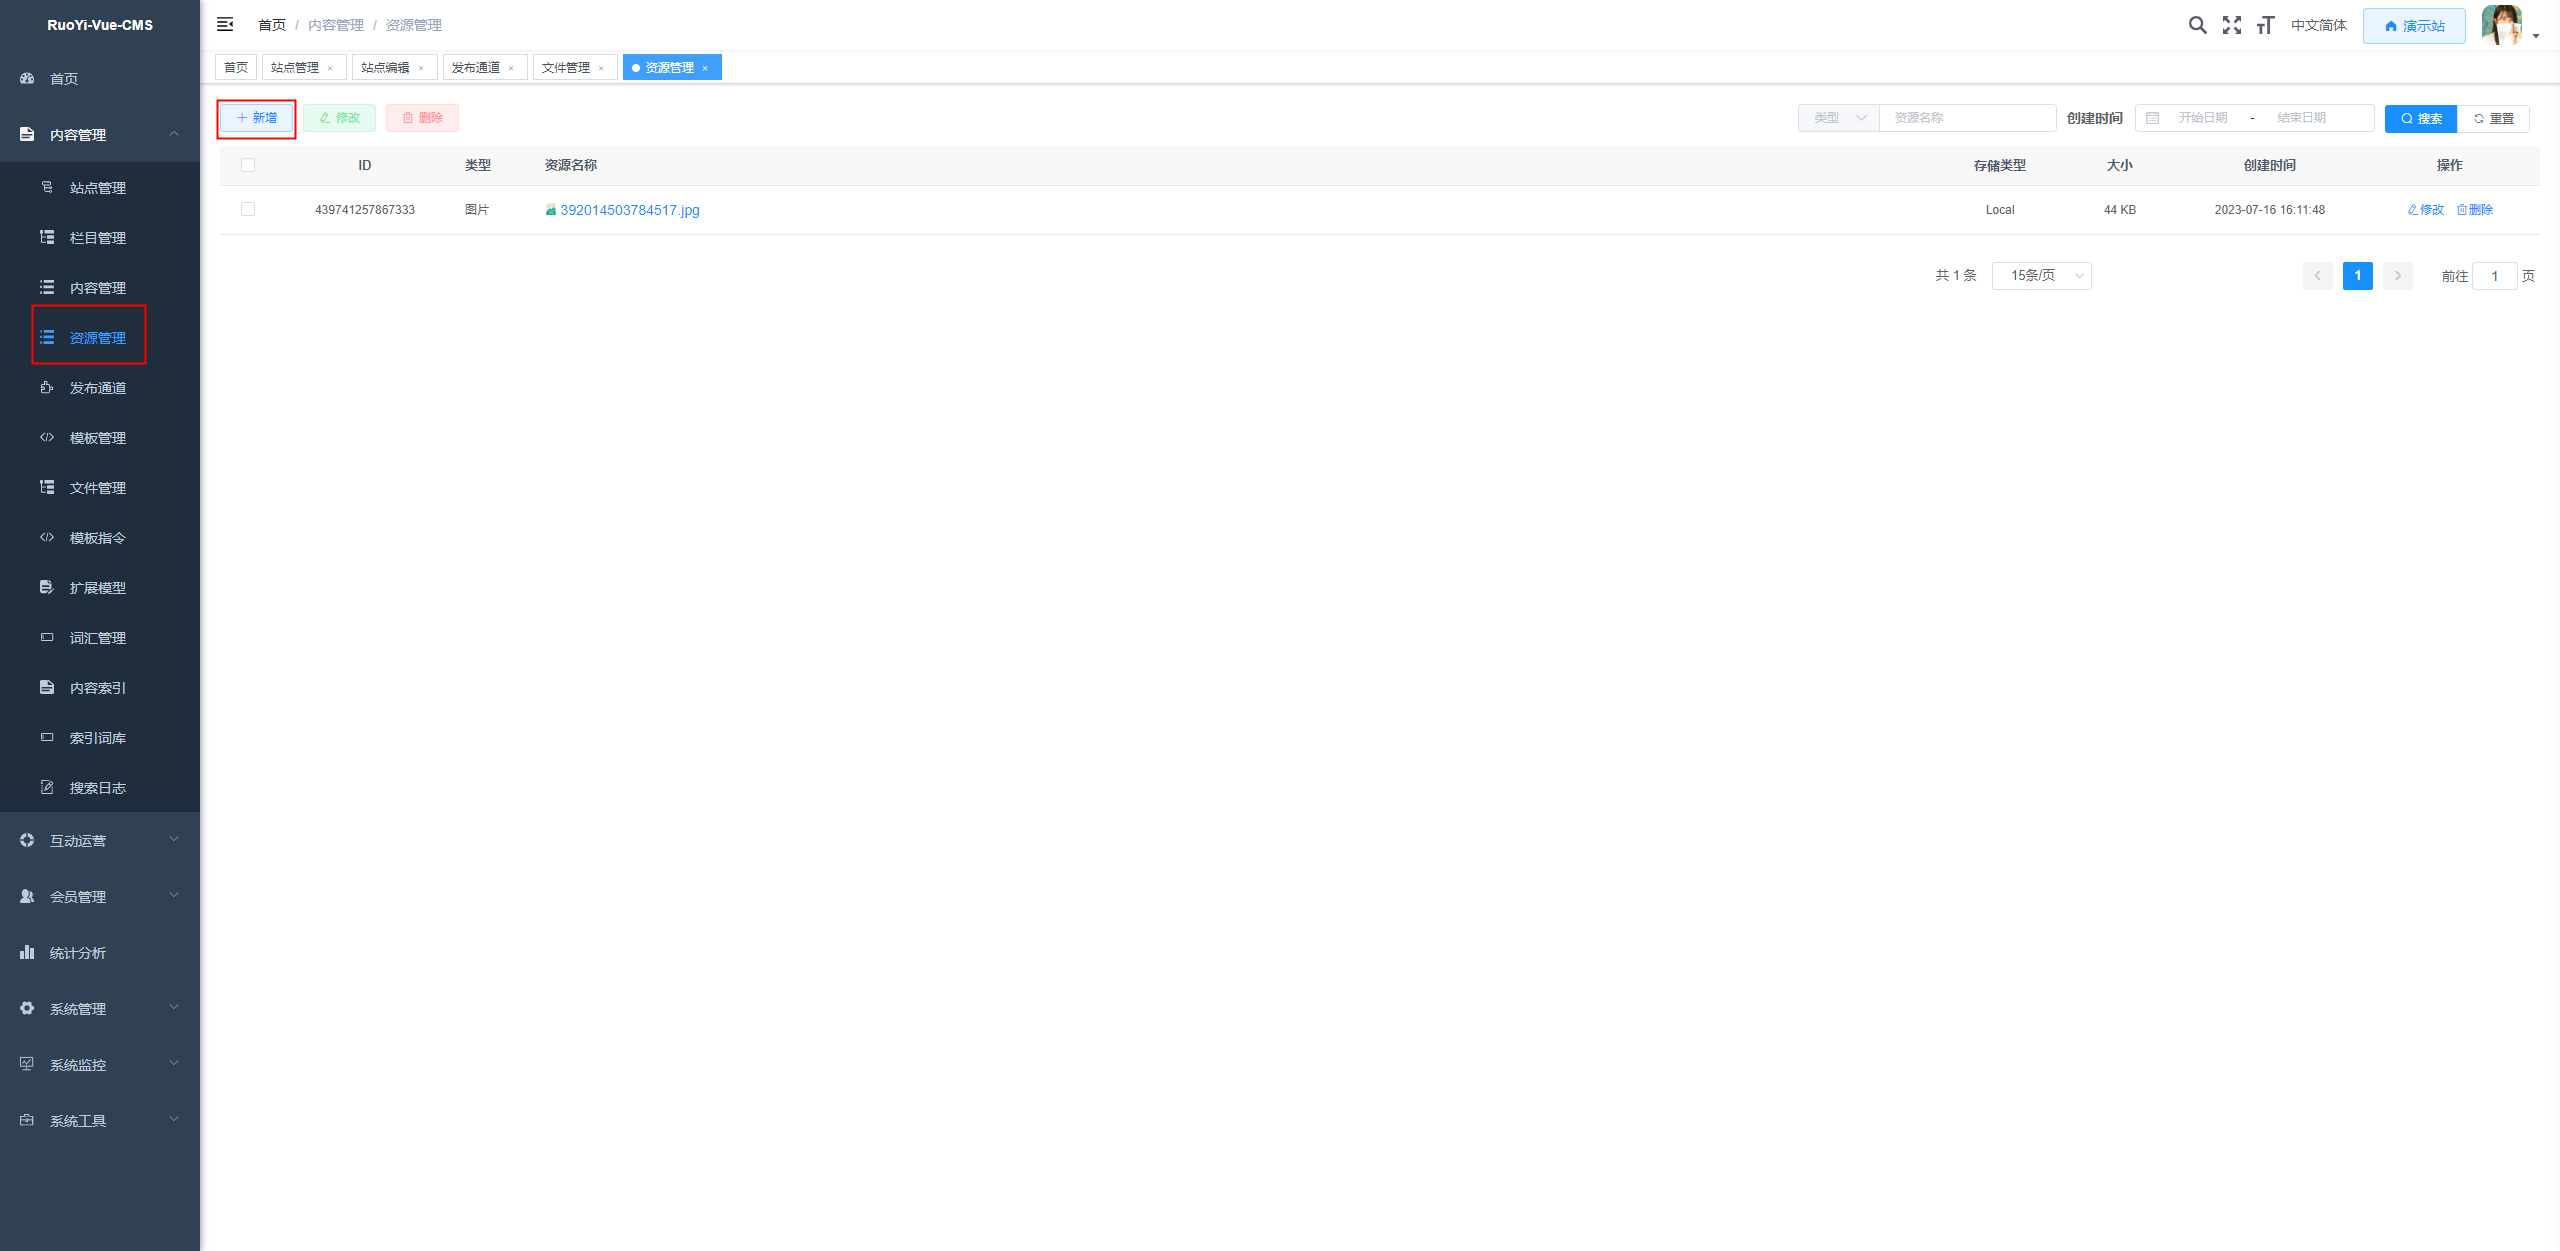
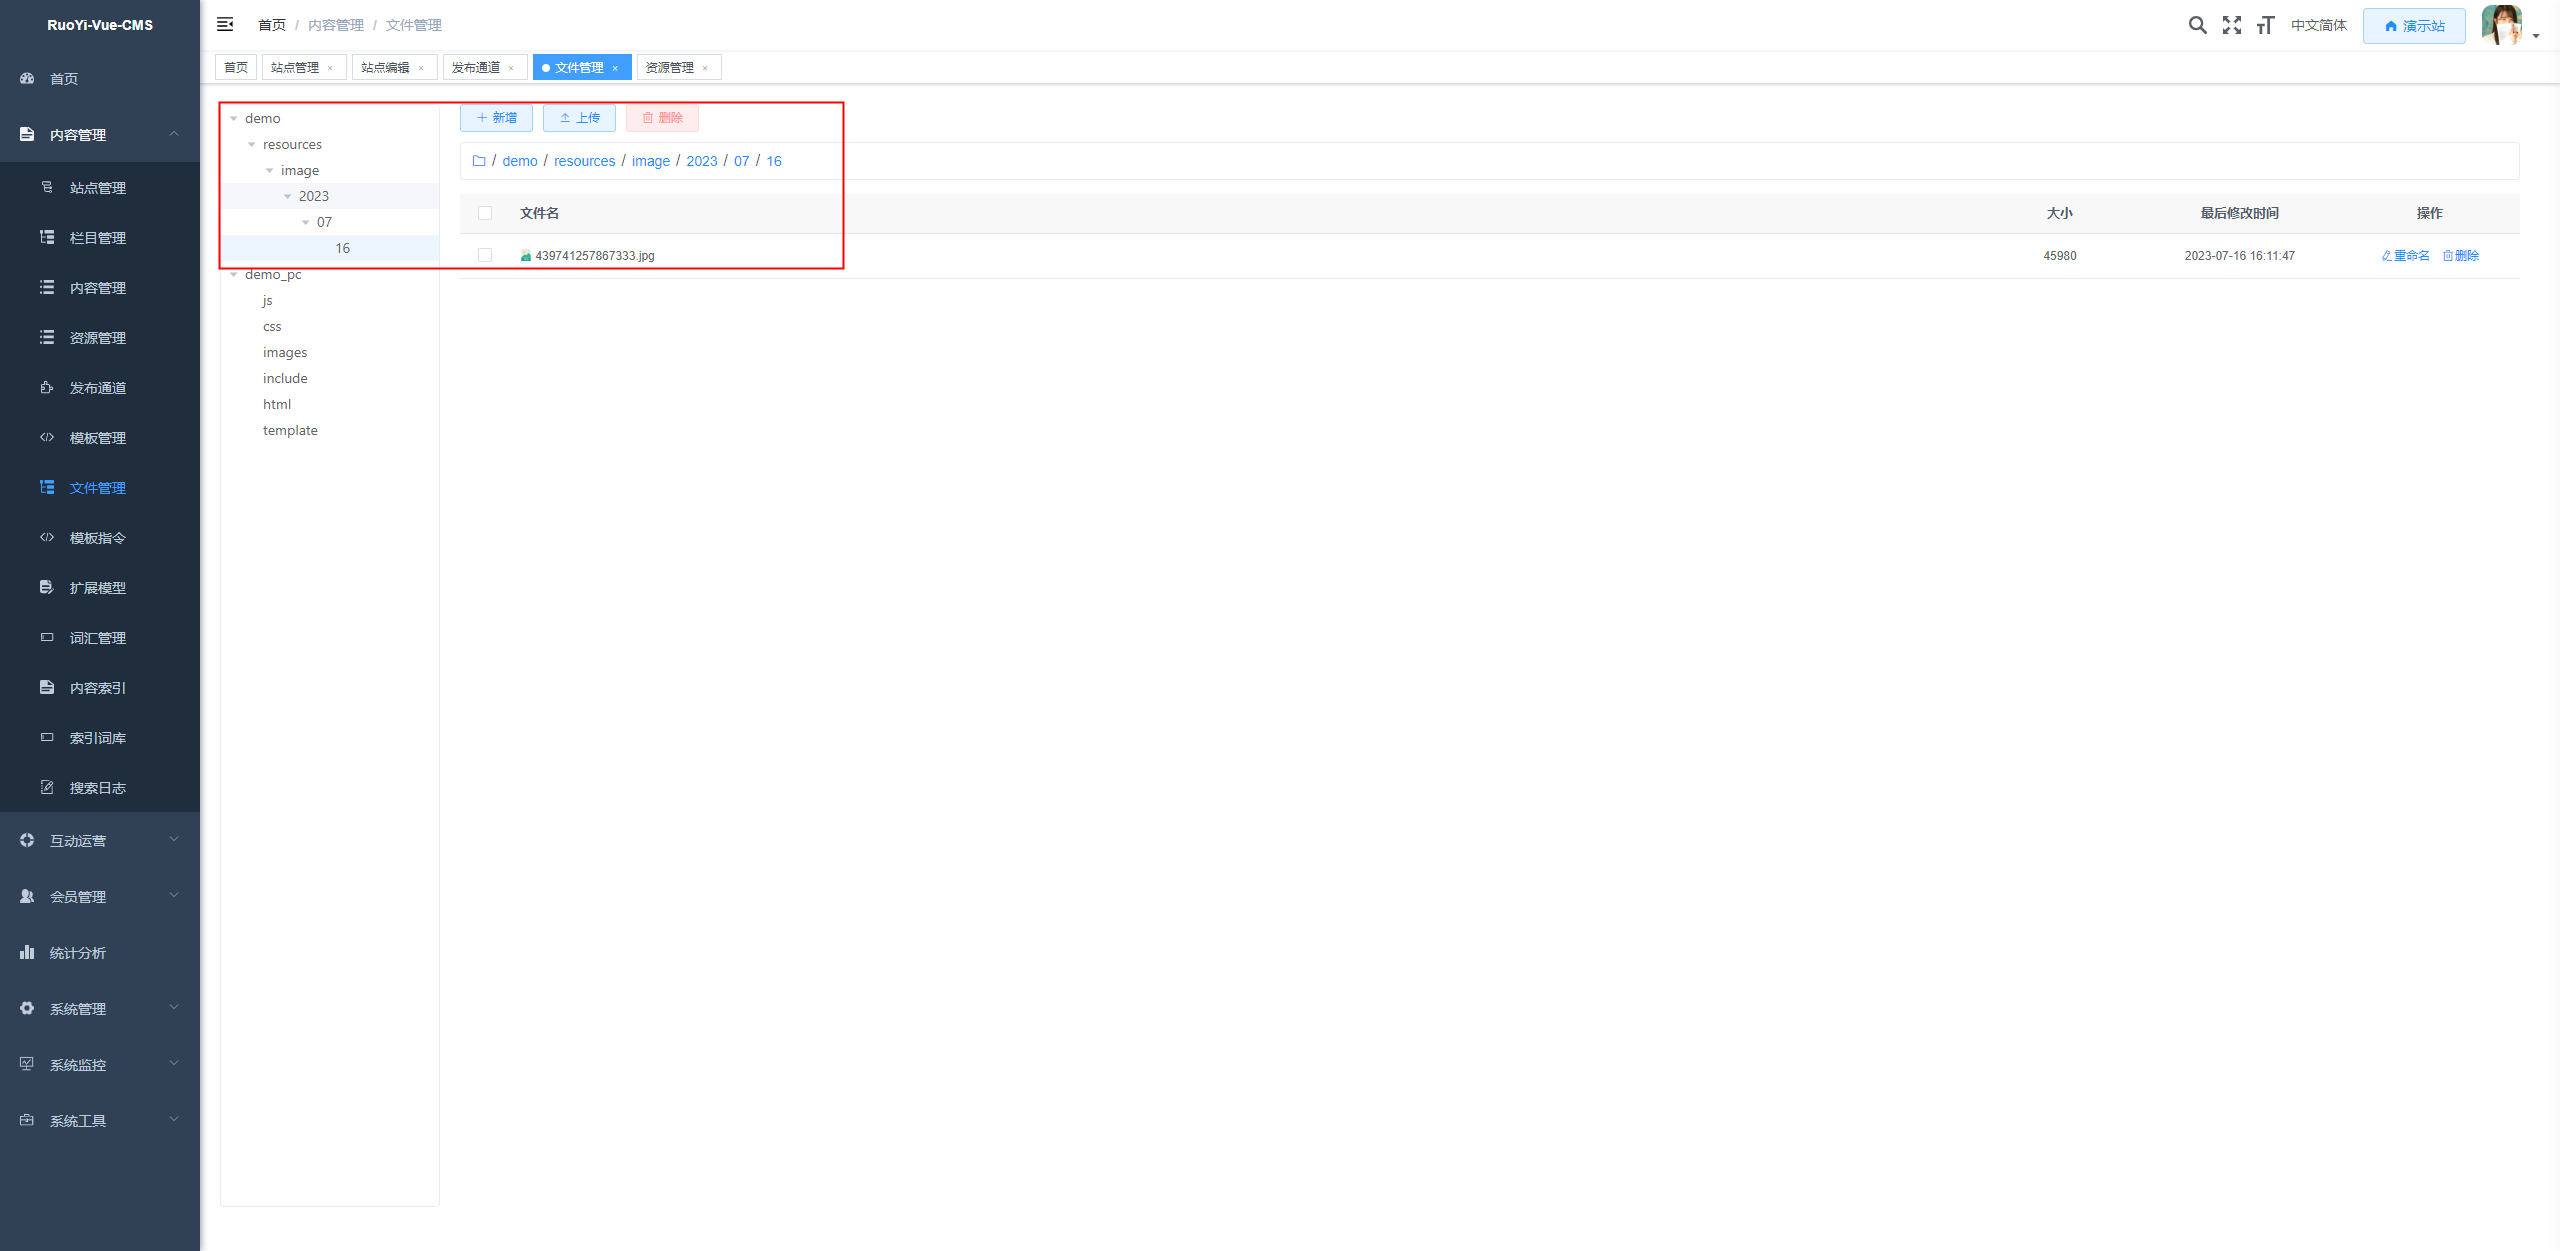
And then, we return back. Content Management > Files Let's take a look at the file directory structure in the menu. It can be seen that there are... demo More items have been added to the directory. resources/image/2023/07/16/ The directory contains the images that we just uploaded.
Set the publishing channel properties for the site
Configure the access domain name
Enter Content Management > Sites Menu. Please go to the demo site we just created. You can see the configuration options for the publishing channel are displayed there. Desktop Regarding the configuration information, we have assigned a URL to the publishing channel. This serves as the access domain name for the publishing channel (specified in the template). ${Prefix} Obtain it.)
Parameter instructions: - URL: The domain name associated with the publishing channel. - Static File Types: The file extensions for static files generated during the publishing process, such as shtml. Default value: shtml. - Homepage Template: This is the template used to generate the static pages for the published channels. The static pages will be created based on this template and stored in the corresponding directory under the published channel. Default value: index.template.html
Preview the site
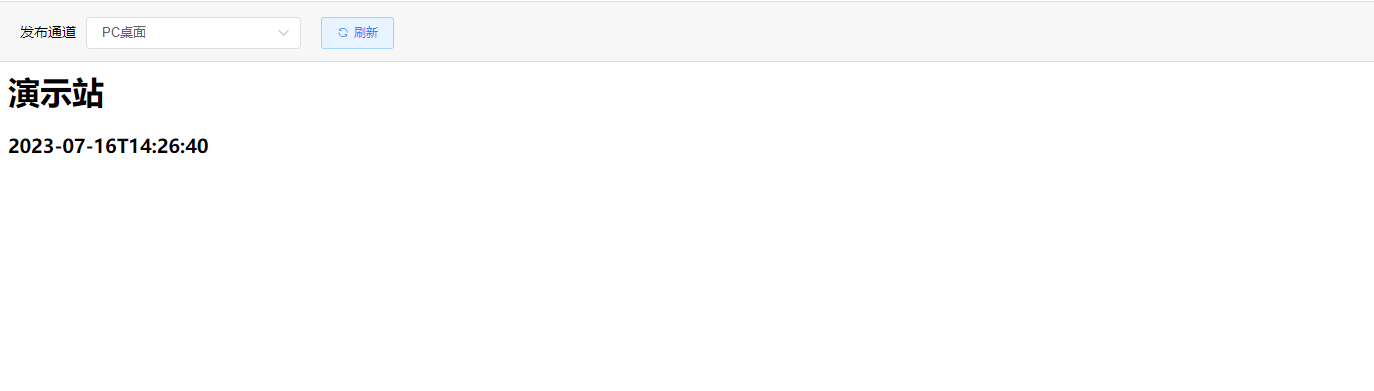
After setting the domain name URL for the publishing channel, click Save Save site information by clicking the button. Then click. Preview Click the button to view the site preview.
Publish sites
Local testing of domain name mapping
Since we are conducting local testing, the domain names of the sites cannot be resolved directly. Therefore, we need to configure the mapping relationships in the hosts file, so that we can perform local debugging more easily.
Take the Windows system as an example. Open the file. C:\Windows\System32\drivers\etc\hosts Please add the content shown in the red box below to the system:
Among them, www.demo.com is the domain name used for accessing the PC desktop publishing channel, while static.demo.com is the domain name used for accessing site resource files.
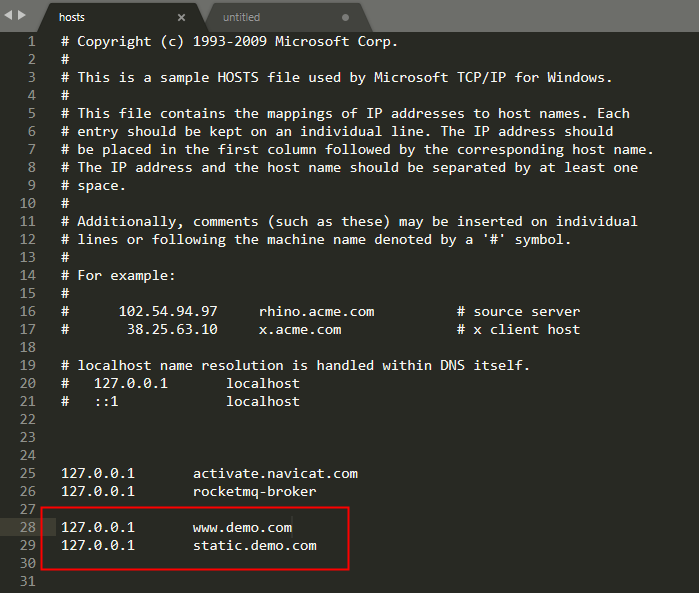
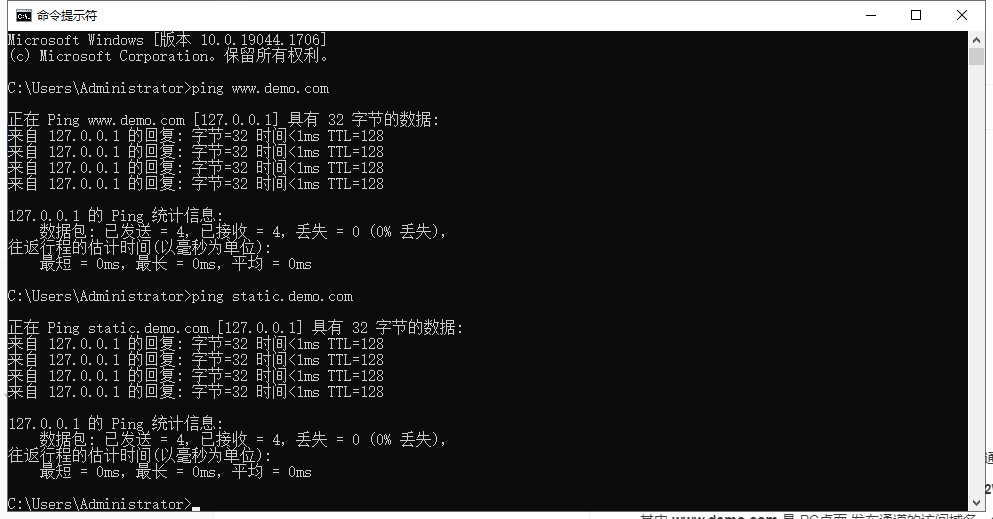
After the configuration is completed, we open the CMS command window and send a ping to www.demo.com and staticdemo.com. It can be seen that the IP addresses used in the pings are now 127.0.0.1.
Configure nginx
For installing Nginx, please refer to the official documentation. Add the following Server configuration to the nginx.conf file. After making the changes, restart Nginx.
    server {
        listen       80;
        server_name  www.demo.com;

        # Configure the PC site with the domain name www.demo.com to access the demo_pc directory.
        location / {
            ssi on;
            ssi_silent_errors on;
            ssi_types text/shtml;
            root D:/dev/wwwroot_release/demo_pc;
            index index.shtml index.html index.htm;
        }

        location ~ ^/(images|img|fonts|assets|js|css)/ {
            root   D:/dev/wwwroot_release/demo_pc;
            expires 1d;
        }
    }

    server {
        listen       80;
        server_name  static.swikoon.com;

        # The resource files uploaded in the backend should be accessed through a unified proxy to the demo directory.
        location ~ ^/(resources)/ {
            root D:/dev/wwwroot_release/demo;
            expires 1d;
        }
    }
Publish sites
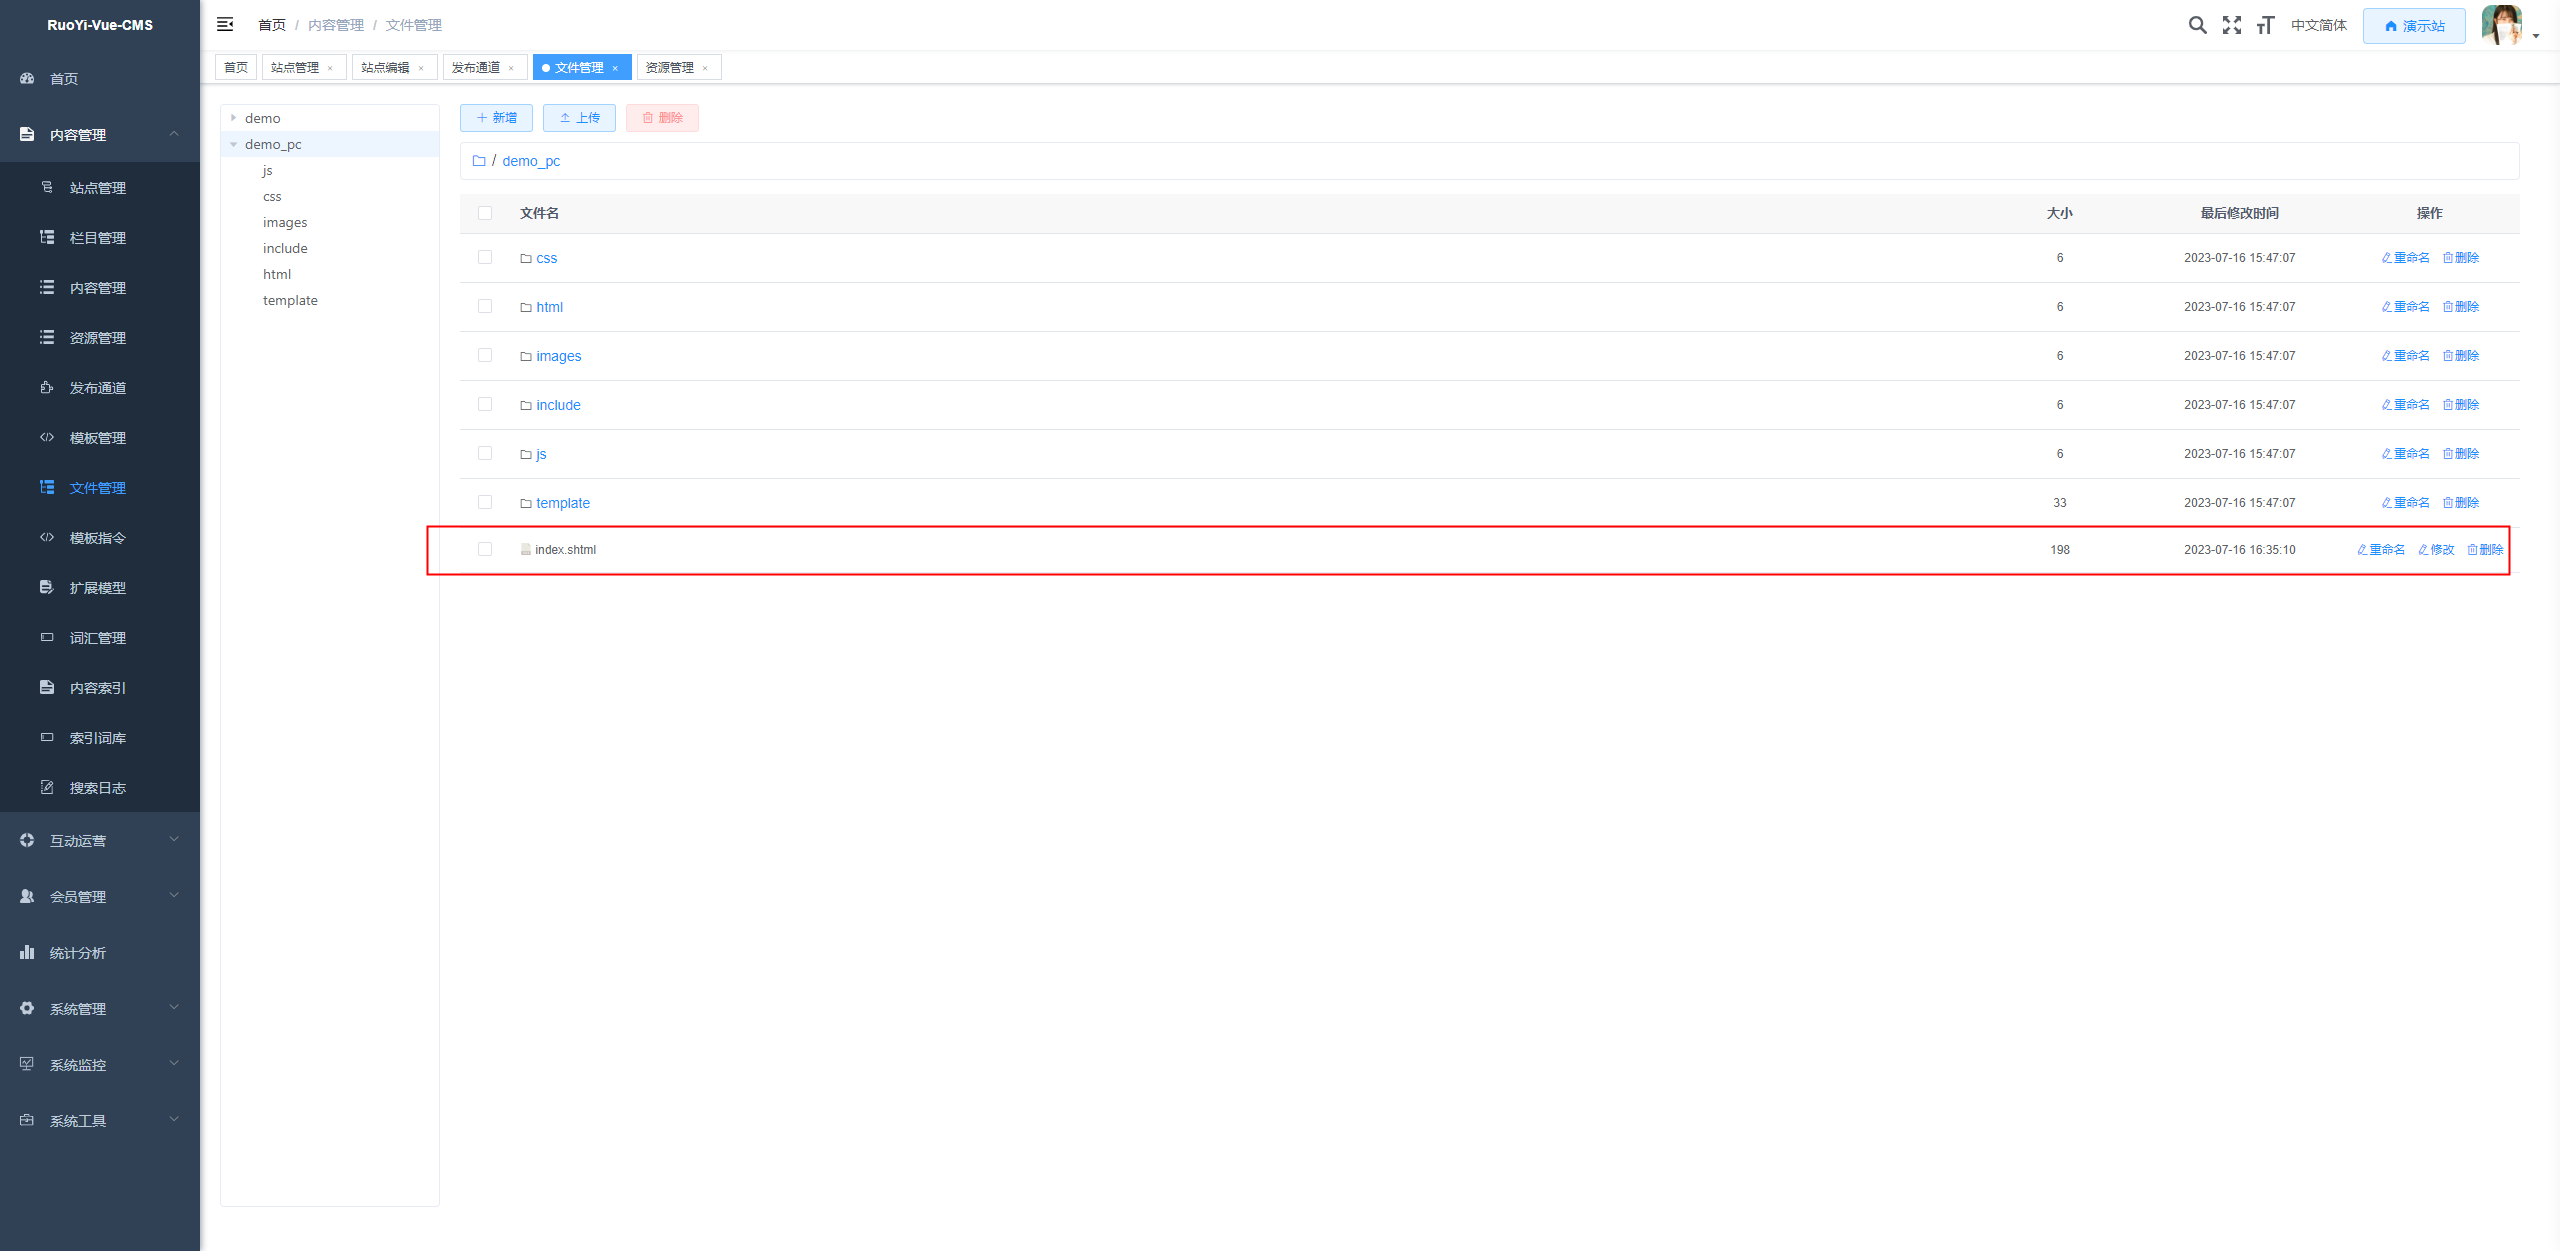
Click on the site editing page. Publish Homepage Buttons indicate successful publishing. We can check the publishing channel directory in the file management menu to see the directory where the content has been published. demo_pc The static files for the homepage have been generated. index.shtml
Browse the homepage of the site.
After the publication is completed, we open our browser and access the site. http://www.demo.com/

