Instructions for using custom forms
Instructions for using custom forms
Taking the contact form of Swei Control Site as an example
The Chestnut CMS system is designed for site administrators and operators. This article explains how to configure custom forms in ChestnutCMS, display these forms on the website pages, and view and maintain the data submitted by visitors. After completing the configuration, it is recommended to submit a test record from the front end, and then verify the results in the backend.
Understand the sample form of Swei Control
The ChestnutCMS is a content management system for websites. It allows users to collect information from visitors through custom forms. For example, in the SweiControl example, contact details such as name, contact number, email, and company name are collected to facilitate subsequent communication. The configuration of the form determines which data will be collected, while the website template decides how these fields will be displayed and submitted on the front end.
Example Configuration Comparison
| Project | Swei Control Example |
|---|---|
| Associated Sites | Swei Control |
| Form coding | contactus |
| Form Name | In the sample initialization data, the value is “xx”. When identifying forms, please use the code “contactus” as the reference. |
| Data Table | cms_cfd_default |
| PC Form Template | customform.template.html |
| Contact Us Page Template | contactus.template.html |
| Verification code is required. | Enable |
| Log in required. | Close |
The form name is used for identification purposes in the backend. It can be set to clear names such as “Contact Us” depending on business needs. The form code is used for referencing templates and should remain stable. Captchas, login requirements, and submission restrictions should be utilized after being verified in the current backend system.
Enter the existing form.
- Log in to the management backend, and select “Swei Control” as the site option.
- Enter Interactive Operation → Custom Forms。
- Find the "Encoding" column in the list.
contactusThe list allows searching by form name and status. The name search box is used to find specific forms based on their names. - To view the submission history, click on the form name or the data list entry within the row. To maintain configurations, click Edit Or, it’s the entry point for managing fields.
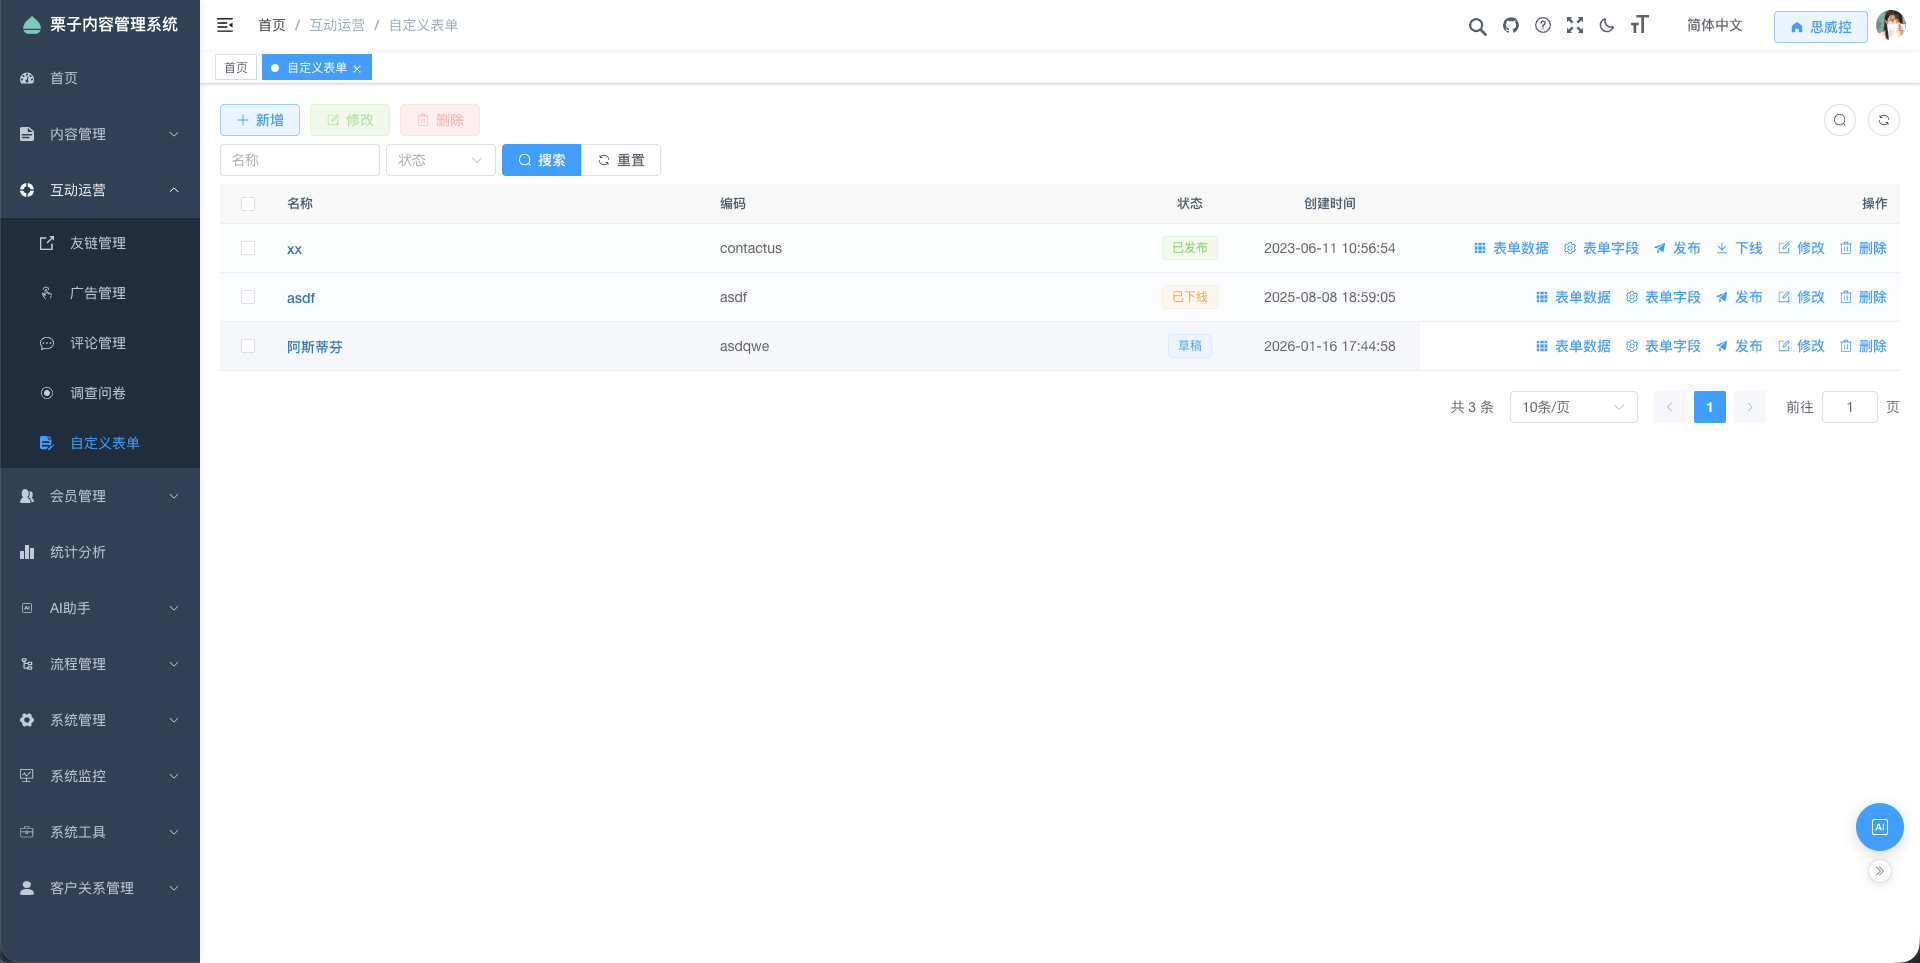
If the form already exists, you can directly check the fields, templates, and submission results. When creating a new form of the same type, follow the instructions in section 2, using a different form code for the new form.
Create a new form and set up submission rules.
Fill in the basic information.
Click on the custom form list. AddedPlease fill in the following information and then click. Submit。
| Configuration items | Filling Method |
|---|---|
| Form Name | Use easily recognizable names, such as "Contact Us" |
| Form coding | Example: contactus. When creating other forms on the same site, use a separate code, such as contactus_test. |
| Data Table | Select "cms_cfd_default" from the dropdown list. Special data tables are prepared by technical maintenance staff. |
| Verification code is required. | Enable the system according to the SweiControl example, and ensure that the front-end template has been connected with the verification code. |
| Log in required. | Enable this feature by referring to the example provided by Siwei Control. This setting allows unlogged-in visitors to fill in certain fields. This feature is only available to members. |
| Submission limits | Select the restriction rules according to the instructions in the next section. |
| Notes/Comments | Record the purpose of the form, such as "used to collect contact information for website visitors." |
The form code can contain letters, numbers, and underscores. The maximum length is 50 characters. The form name can have a maximum length of 100 characters. The data table can only be selected during creation; there is no option to change the data table in the editing window.
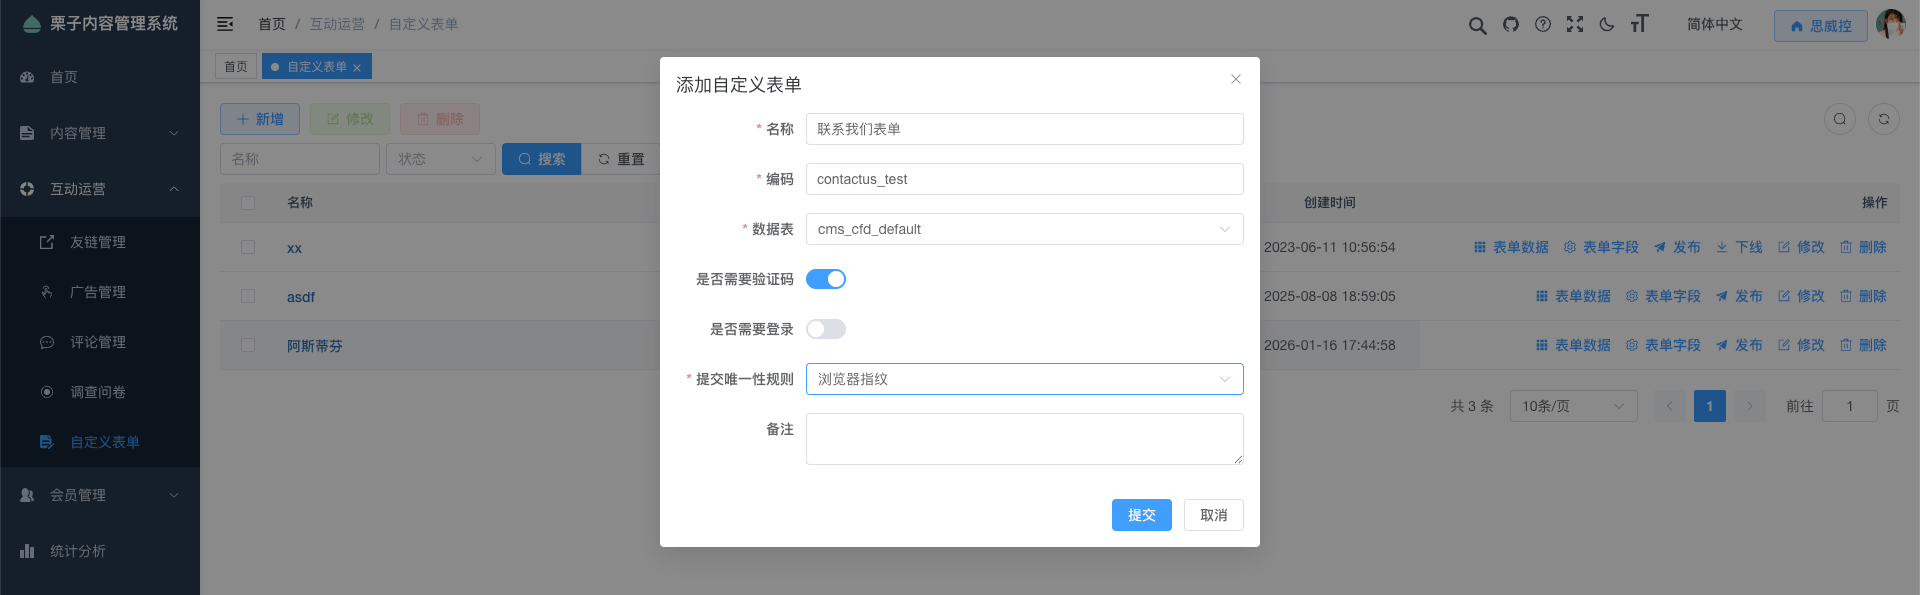
Select submission restrictions
| Rules | Actual functionality | Please note the usage instructions when using this product. |
|---|---|---|
| Unrestricted | Do not prevent duplicate submissions based on IP or visitor identifiers. | It is necessary to meet the configured login requirements, verification codes, and field validation criteria. |
| IP | When there are already submissions with the same IP in the same form, further submissions are rejected. | Visitors from the same organization or network may share the same exit IP address. |
| Browser fingerprints | When there are already records with the same visitor identifier in the same form, further submission is rejected. | Depends on the identifier transmitted from the front end; can be used during login with a member identifier. |
These two deduplication rules are based on the existing records. It should not be interpreted as meaning that submissions are allowed only once per day. For cases where customers may need to submit requests again in the future, they can choose to set the option to “No Limit” and retain the verification codes. Whether to allow repeated submissions depends on the specific requirements of the business.
After the addition is successful, the form status will be DraftNext, let’s configure the fields. Please proceed as usual. Edit Select the template, then publish and verify it.
Configure the fields that need to be collected.
Example of Siwei Control Fields
In contactus Click on the "Field Management" button in the relevant module to view or configure the desired fields.
| Field Name | Field coding | Data types | Form Controls |
|---|---|---|---|
| Name | uname | Short texts | Single-line input field |
| Contact number | phone | Short texts | Single-line input field |
| Short texts | Single-line input field | ||
| Company Name | company | Short texts | Single-line input field |
The field encoding is the name used when submitting data on the front end. For example, the first-name field is submitted as uname It cannot be changed arbitrarily in the template. name The contact number is stored as text, which helps to maintain the format required by numbers with leading zeros or regional codes, as well as other relevant formats.
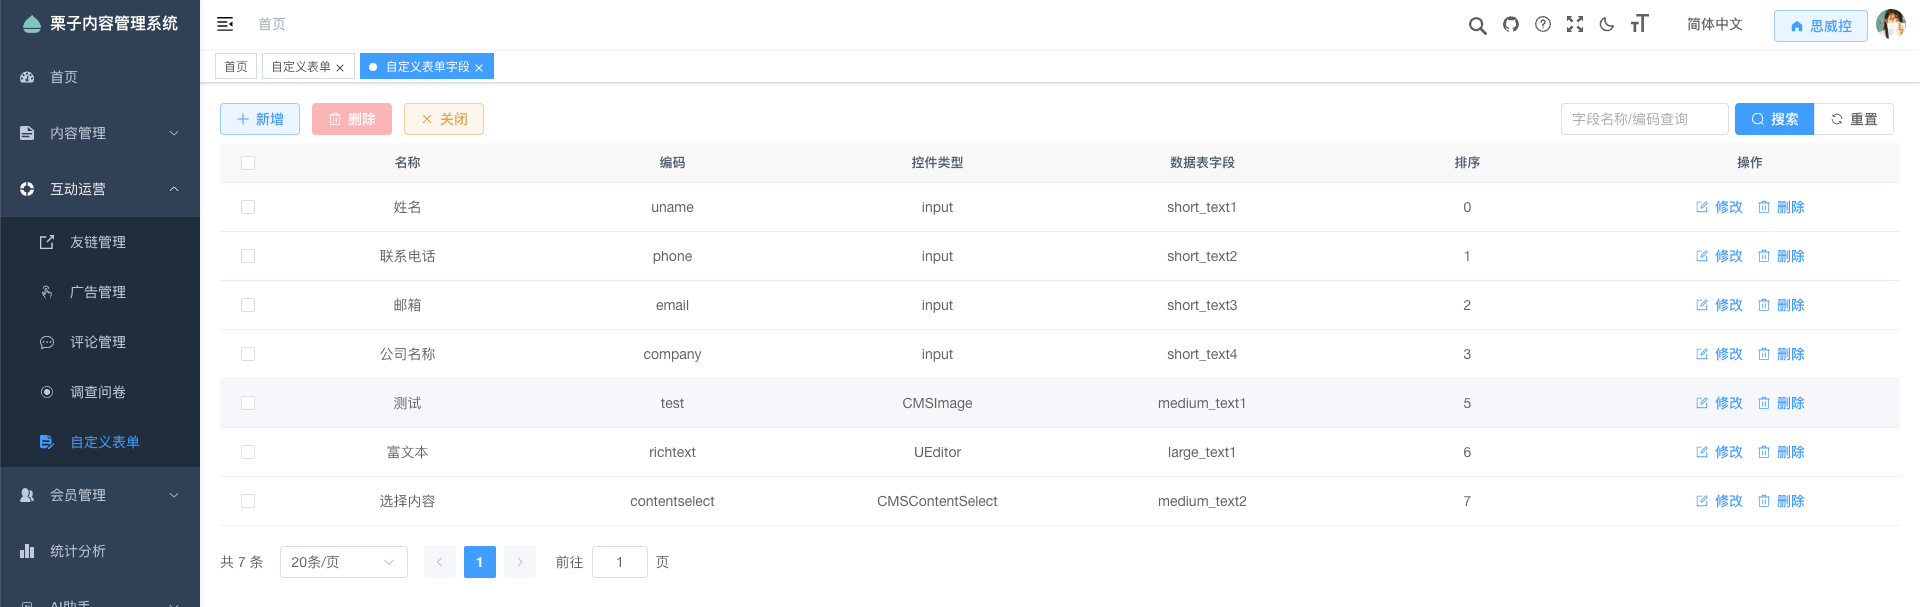
Add or edit a field.
- Click AddedWhen maintaining existing fields, click on that row. Edit。
- Fill in the field names and codes. For example, “Name” and “Code”.
uname。 - When using the default data table, select the appropriate data type, such as “Short Text”. When using a custom data table, select the corresponding mapped field.
- Select a form control, such as a single-line input field. If you need to enter multiple lines of text, choose a multi-line input field and use a data type that can accommodate the required amount of content.
- Set validation rules, default values, sorting methods, and remarks according to your business needs. Click to proceed. Confirmed Save.
- Return to the list to check the fields. Using a fixed HTML front-end template, it’s also necessary to adjust the input items and their order accordingly.
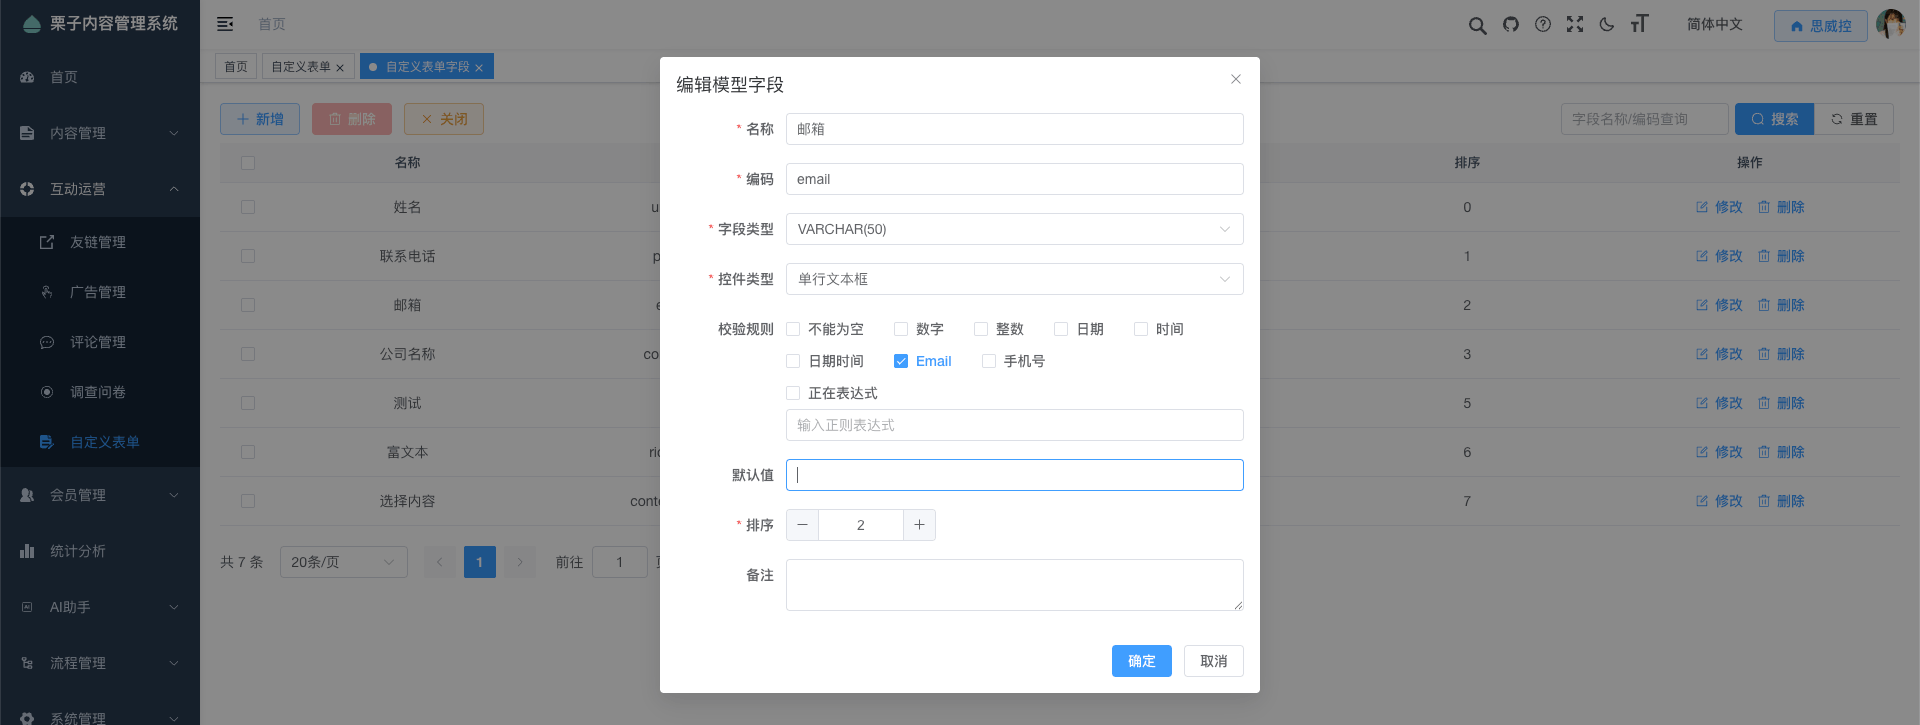
Set up verification and extension fields.
The “Non-empty” validation criterion ensures that visitors must fill in certain fields. The “Email” validation criterion checks the format of email addresses. As for contact numbers, it should be validated using “mobile phone numbers”. It’s necessary to determine whether fixed-line phones, extension numbers, or international numbers are allowed before implementing this validation method.
It is recommended to specify the name, contact number, and email address as required based on the business context. The company name can be optional. These are merely recommendations for configuration purposes. Actual requirements should be based on the validation rules stored in the corresponding fields, and these rules should also be reflected in the front-end prompts.
If you need to add "consultation content," please add a new field. message Use multi-line input fields and appropriate text types. Please ask the template maintenance personnel to also add corresponding input fields on the front end. This field is an example for expansion purposes, and does not belong to the four original example fields mentioned above.
When modifying field codes, types, mappings, or deleting fields after official data has been established, the impact on historical data and front-end templates should be evaluated.
Configure the templates and publish them to the front end.
Select a template for the form.
- Return to the custom form list and click
contactusIn the bank where it is located Edit。 - In the template section corresponding to the PC release channel, click the folder button and select the desired folder.
customform.template.html。 - For other publishing channels, configure the appropriate templates as needed, then click “Next”. Submit Save.
The template items are displayed in the editing window after the form is created. When there are no template items in the new window, save them first, and then proceed to editing.
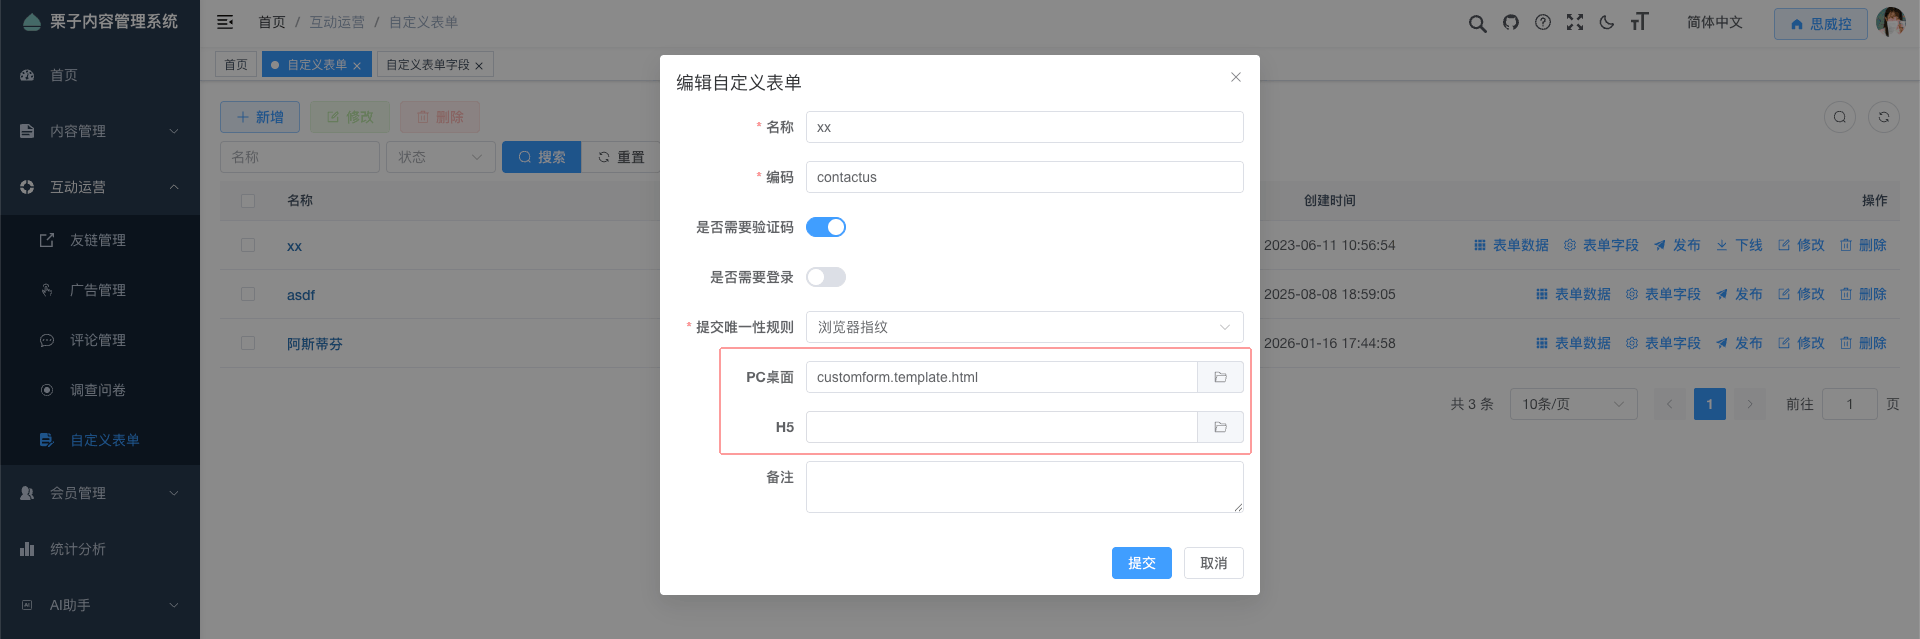
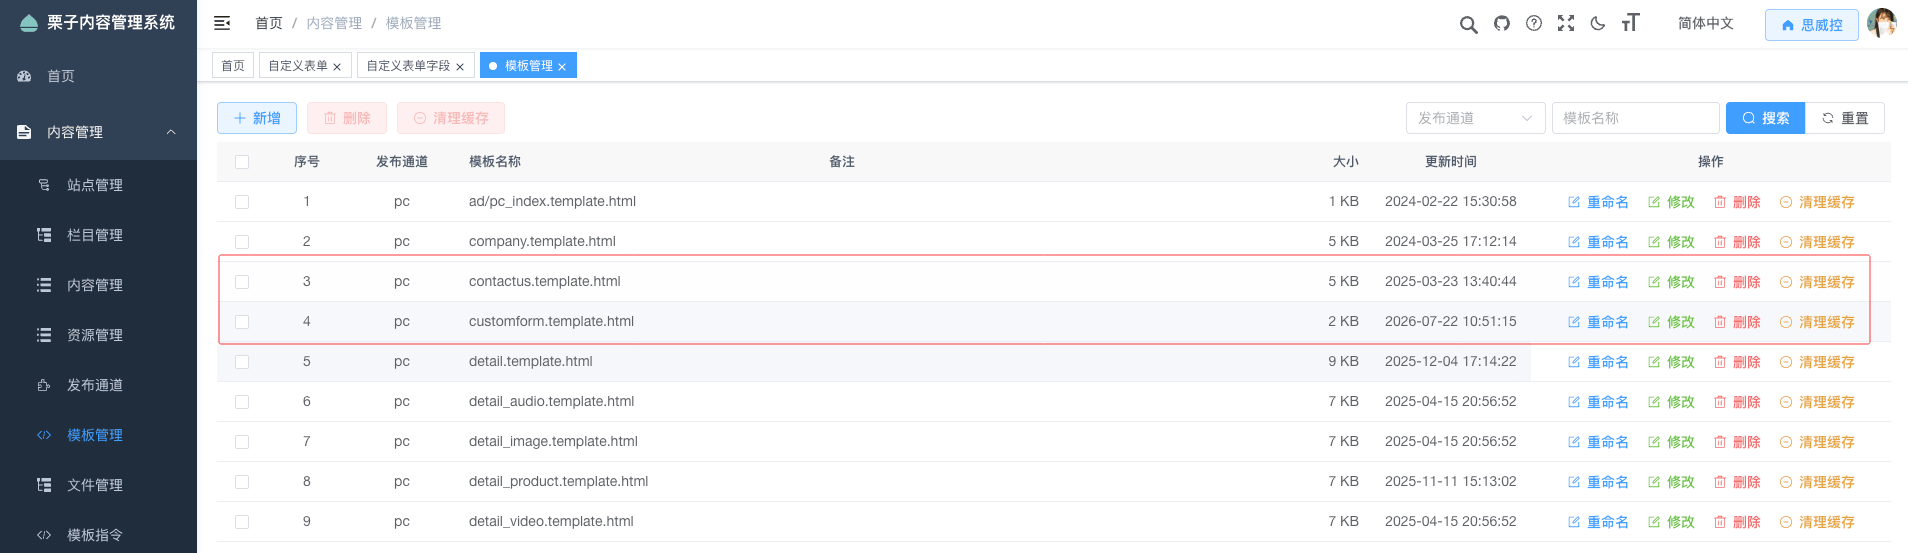
Confirm that the contact page includes a form.
Form templates are responsible for handling input fields and submission actions. The contact page template, on the other hand, is responsible for managing the layout of the website pages. In the SweiControl example, there are two such files. customform.template.html and contactus.template.html。
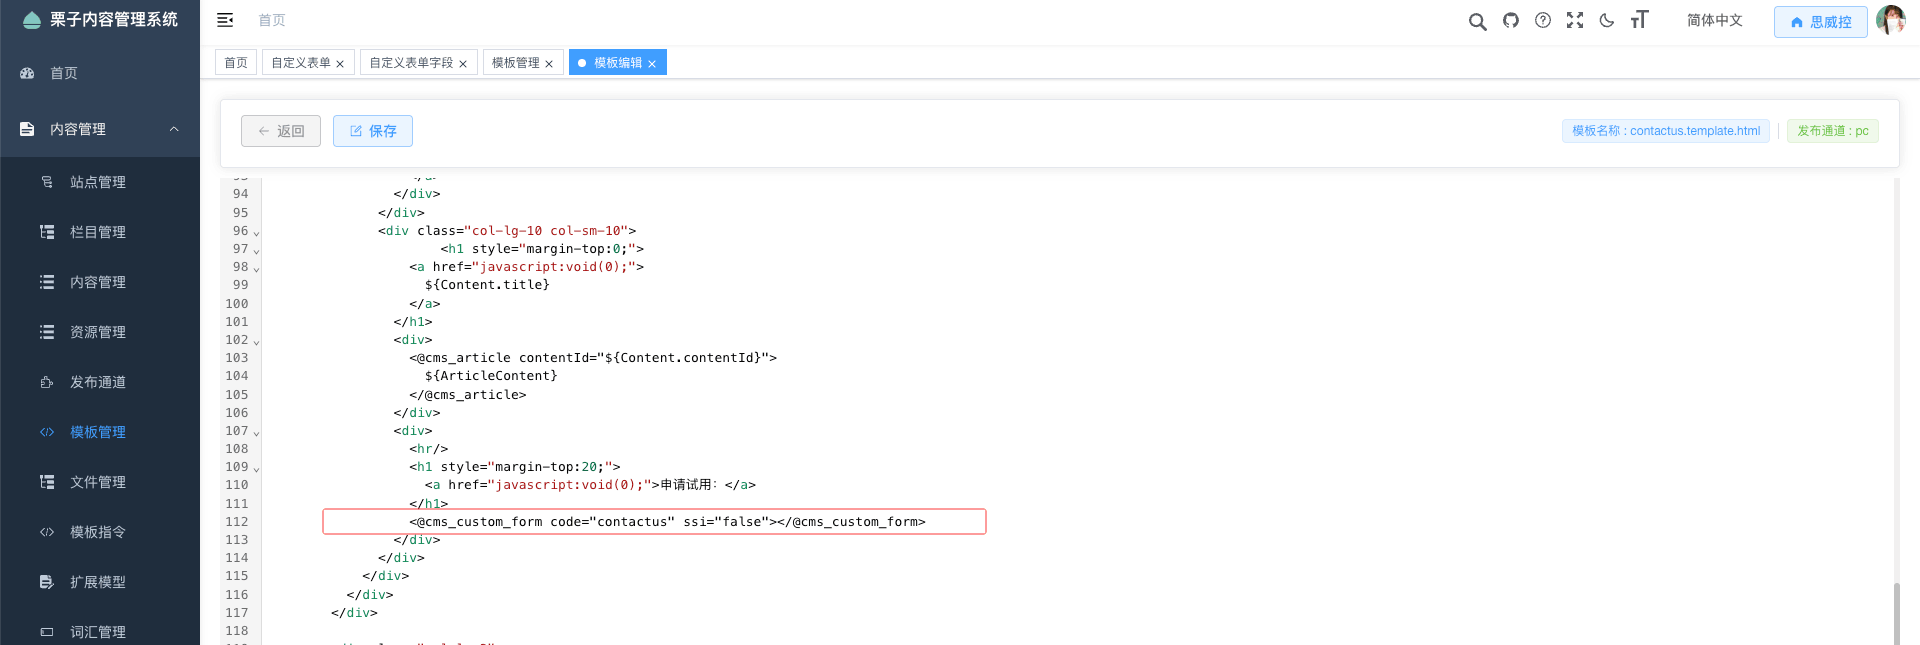
The template maintenance team should ensure that the contact page includes the code referenced in the appropriate locations. contactus Form. You can use the following template tags:
<@cms_custom_form code="contactus" />
The template must match accordingly. uname、phone、email、company Four fields for encoding. After adding new backend fields, it is necessary to also add corresponding front-end input boxes in the HTML template accordingly.
Publish and check the results.
- Return to the custom form list. Click on that row. PublishThe confirmation status is displayed as Published。
- Re-publish the “Contact Us” page using this form. If there are any changes to the page template, please re-publish all affected pages as well.
- Open the “Contact Us” section on Siwei Control’s website. Check that all fields, verification codes, and submit buttons are filled in properly.
- If the page still contains outdated content, please first check the current site, publishing channels, and templates. Then, review the publishing tasks and page caching settings.
After publishing, it is necessary to confirm the effectiveness by checking the actual page display and submitting the results. Just seeing the "published" status cannot replace real-time verification.
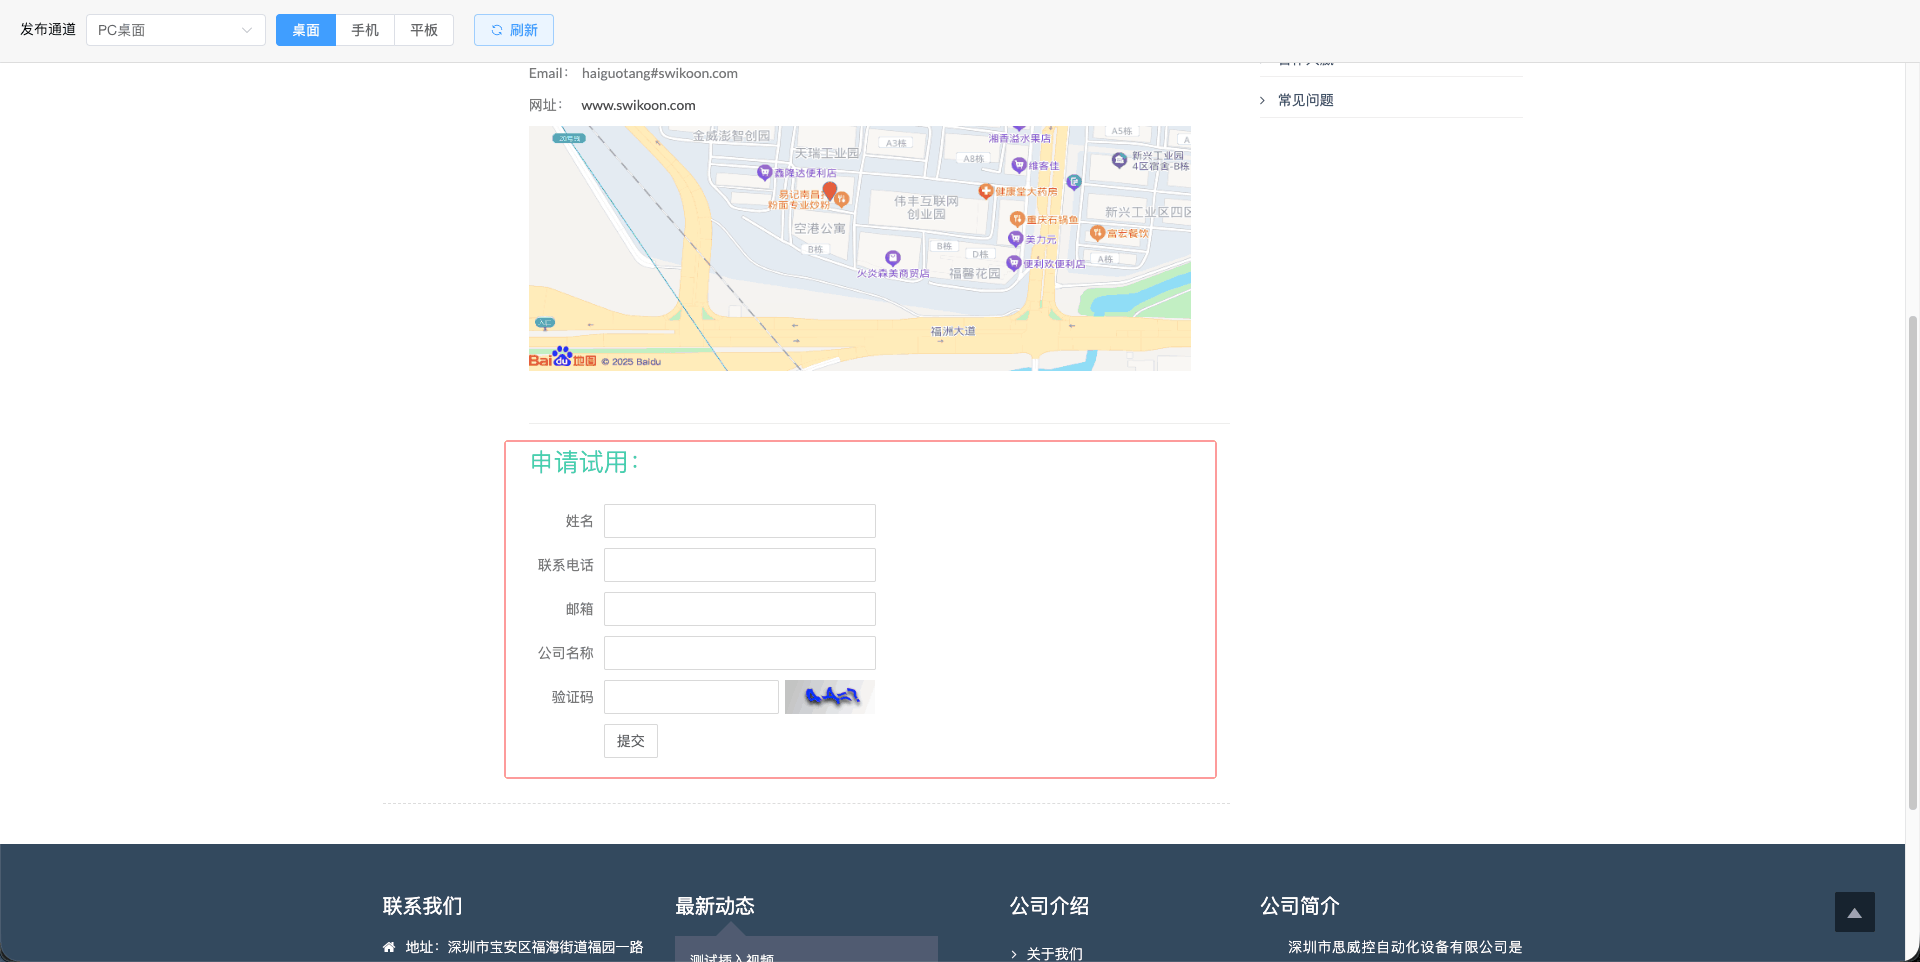
Complete the submission verification once from the front end.
Submit normally
- Open the “Contact Us” page on Siwei Control’s website, and verify that the entered information matches the values in the backend database.
- Fill in the test materials with easily recognizable information. For example, use “Form Test” for the name, “Test Company” for the company name, and email address.
form-test@example.comThe phone number used must be approved for testing and comply with current validation rules. - If the CAPTCHA feature is enabled, please follow the instructions on the page to complete the verification process. If the login requirement is enabled, please use your logged-in website account to proceed.
- Click “Submit”. A success message will appear on the confirmation page. The specific message displayed is determined by the front-end template.
- Return to the backend data list, find the test records from earlier, and verify the content filled in item by item.
Check for any exceptions simultaneously.
| Verify the project | Operation instructions | Expected checkpoints |
|---|---|---|
| Required validation | Leave the fields that have been set to non-empty validation empty when submitting. | Prompt for supplementation. No successful records will be added in the backend. |
| Format verification | Enter the incorrect format for fields that have been set to email validation. | Error occurred during format processing. Please correct the issue before proceeding with the submission. |
| Verification Code | Do not complete the verification process or submit with invalid verification results. | Verification failed. Please try again after re-verification. |
| Reposting | Submit again in the test environment according to the selected rules. | IP or browser fingerprint rules should prevent the occurrence of duplicate records. |
| The front and back ends are consistent. | View the just-submitted records | Name, Phone Number, Email, Company Name — These fields should match the entered information. |
Tests should cover the actual channels used for publishing. Manual additions made in the background can only serve as supplementary checks and cannot replace the verification processes involved in submitting requests, generating verification codes, or handling duplicate submissions.
View and maintain submitted data
Open the data list
Click on the custom form list. contactus By clicking on the corresponding form name or data list entry, you can view the data received from that form. The list is displayed by field, and system fields such as IP address, UUID, and creation time can also be displayed.
Query and view records
Enter the complete IP address in the IP query box, then click. SearchClick here Reset Clearing conditions. When there is too much information to handle, use the bottom pagination option for viewing. This page currently allows for IP-based searches; please do not use this input field as a search box for names or phone numbers.
Click on the row to view the complete editable content of a certain record. EditJust check the items when viewing them. Click to complete the process. Cancel; When it’s necessary to make corrections, click again. Submit Save.
Manual supplementation and correction are required.
- Manual entry: Click on the data list for AddedPlease fill in the fields and then click. SubmitUsed to input information received through telephone or other channels.
- Correction: Click on the row containing the records. EditAfter verifying and modifying the fields, click “Submit”. SubmitIt is necessary to confirm the source of information before adding or correcting any content, in order to avoid overwriting the original statements made by the client.
Delete records.
Single deletion can be performed using the record row. Delete Buttons; For batch deletion, you can select the records first, then click the top button. DeleteIn the confirmation window, double-check the scope again. Only remove those tests or invalid records that truly do not need to be retained.
The current data list allows for adding, editing, deleting, and querying IP addresses. There are no separate buttons for exporting, reviewing, or responding to data. If you need to back up, export, or follow up on records, you should use the existing management tools available in the team, or consult with administrators for assistance.
Daily maintenance and issue resolution
How does the modification take effect after being made?
After modifying the form configuration, click. Submit Save. When dealing with fields, templates, or front-end displays, ensure that the templates are checked simultaneously. Re-publish the form and the pages that use it, then perform another validation process for the front-end submission. After adjusting the required fields and format checks, verify that the front-end prompts are consistent with the backend rules.
Subscribe and delete
When the display is paused, click on the published forms. DiscontinuedConfirm that the status has changed to DiscontinuedAlso, check whether the contact page still contains the form. When you resume using it, configure the settings again and then publish the page once more.
The form static segments generated will be removed when the service is discontinued. If the business requires a complete cessation of data collection, it is necessary for technical maintenance personnel to ensure that both the page entry points and the submission interfaces are disabled accordingly.
Before deleting a form, it is necessary to back up the data that needs to be retained, remove references to the page template, and ensure that the form is no longer in use. Deleting a form is different from deleting individual submission records; it’s better to temporarily deactivate the form before permanently removing it from use.
FAQ
| phenomena | Verification method |
|---|---|
| Unable to find contactus. | Confirm that the current site is Siwei Control. Clear the filtering options for name and status. Then, view the encoding column. |
| When adding new items, there is no template item. | Save the form first, then enter the editing window to select the publishing channel template. |
| The fields have been added in the backend, but not displayed in the frontend. | Check whether the template has added the corresponding input items, whether the coding is consistent, and re-publish the page. |
| The published content is displayed, but there are no forms on the front end. | Check the encoding used in the pages, corresponding channel templates, publishing tasks, and page caching. |
| Please log in first. | Check whether "Login Required" is enabled; backend login does not equal website member login. |
| Please do not submit the form repeatedly. | Check the IP or browser fingerprint rules and existing records to ensure they meet business requirements. |
| The UUID parameter cannot be empty. | Please have the template maintenance personnel check the generation and delivery of visitor identifiers. |
| The submission was successful, but the record cannot be found. | Confirm the same site, the same form. Clear the IP filter and refresh the list. |
| The data fields are empty or misplaced. | Verify the encoding of fields submitted on the front end and those in the backend, especially for example fields like uname. |
Items for verification by template maintainers:
- The form code referenced in the page is
contactusThe form templates are configured in the correct release channels. - Use the current form template for form templates.
CustomForm.formIdThe submission address is valid.CustomForm.action。 - Submit data for use
uname、phone、email、companyWait for the backend field encoding, and it should include…formId。 - Front-end submission interface:
POST /api/customform/submitReceiving JSON data; the root address of the interface should be determined according to the site configuration. - The front-end requires the transmission of a visitor identifier. Currently, it can be transmitted via request headers or request parameters.
cc-uuidWhen enabling the verification code mechanism, it is necessary to use the same identifier as used in the verification code process. - The entry point for obtaining verification codes is
GET /api/customform/captchaIt’s necessary.formIdThe data used to submit the verification code should follow the format used by the components already integrated into the website. - When using SSI for embedding, make sure that the server supports SSI. After any changes are made to the template or form, verify the actual generated pages. It’s important to check the status of the backend system as well.
