Workflow Usage Manual
Workflow instructions: Create a secondary approval process for content.
Complete a secondary approval process for content on the ChestnutCMS website:**The administrator creates the article and submits it. It goes through testing level one approval process, then demo level two approval process. Finally, the administrator checks the results.**Please proceed step by step. For each step, there are examples that can be used as a reference, along with instructions on how to verify the completion of the task.
In this example, the option “Mark as Approved” was selected. Once this is done, the article will be approved, but will not be automatically published on the website.
Log in and confirm the sample account.
Open the backend, enter your account and corresponding login password, complete the page verification, then click. Log in。
| Role in this example | Login account | Names of people on the page | Responsible for the operations |
|---|---|---|---|
| Administrator | admin | Super Administrator | Create process, configure categories, create articles, submit for review |
| First-level approver | test | Tester | Review articles and complete the first-level approval process. |
| Second-level approver | demo | Demo User | Review the articles and complete the second-level approval process. |
Use it first. admin Log in. When you need to switch accounts later, click on the avatar in the upper right corner and select **Exit login.**Click in the confirmation box. ConfirmedThen log in to the next account.
The screenshot is taken from the actual operations described in this example. When practicing again, the content ID, creation time, and completion time will be different. If the example process already exists, you can add the process name, process code, column name, alias of the column, and column path to it.
2And always choose the option that you created in the subsequent steps.
Create process definition
2.1 Starting from the content review template
Current account: admin.
- Click on the left side. Process Management → Process Definition。
- Click Added Right-side dropdown arrow.
- Click Add new items according to the template.。
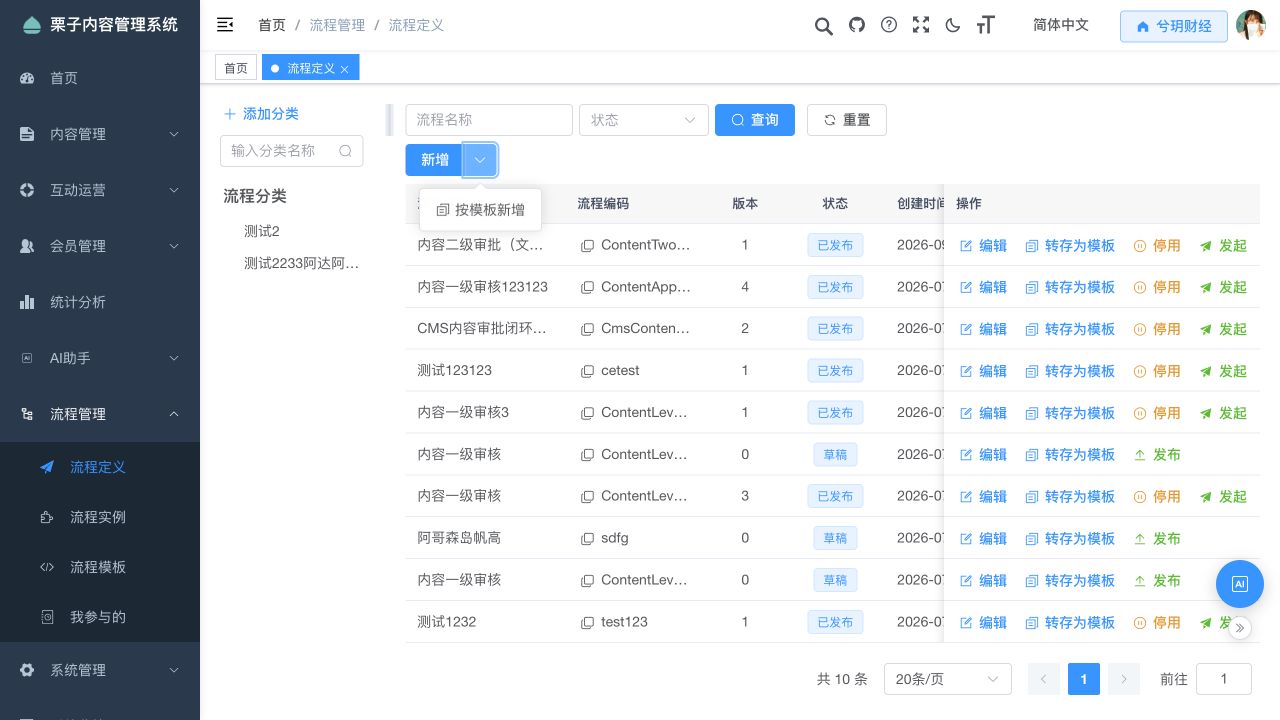
- Select a workflow template in the window. System-specific templates。
- Find Content first-level reviewClick on the row to the right of this line. Creation Process。
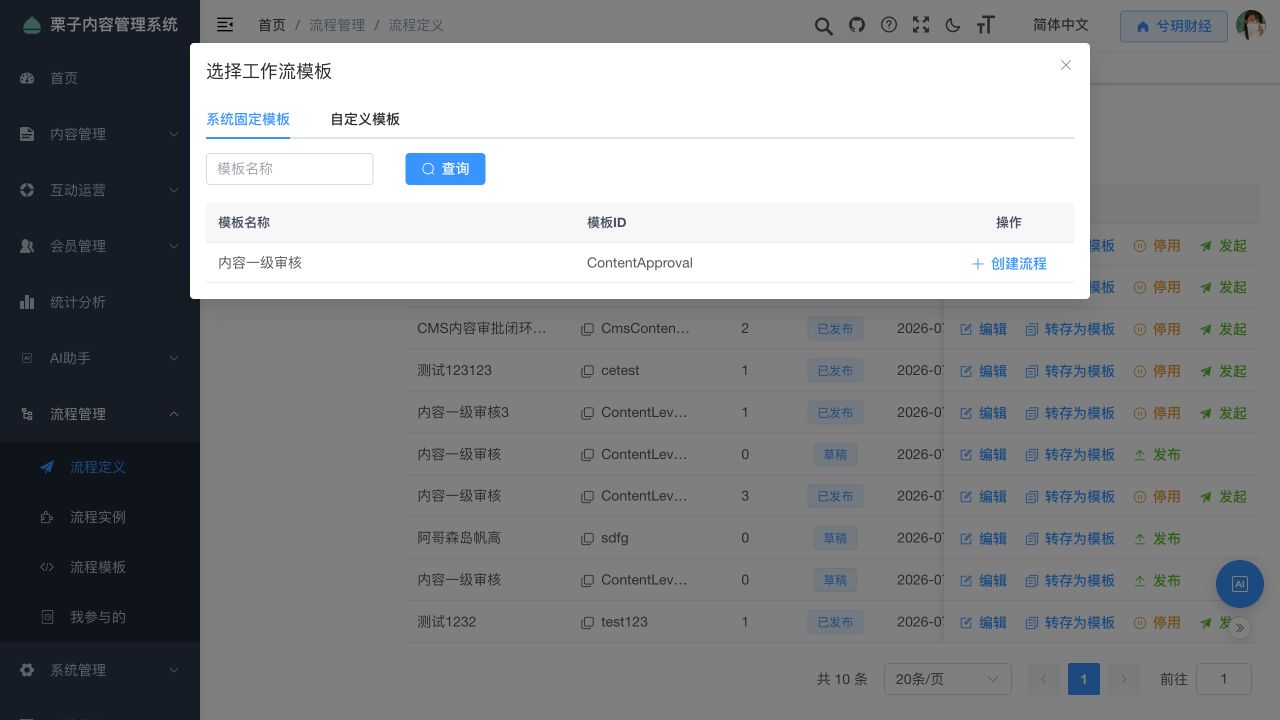
This example must be created using the “Content Level Review” template. The "first-level" in the template names does not affect subsequent operations. We will introduce a second-level approval process in our design.
After creation, the following will be displayed at the top of the page: Basic information, form design, process design, other configurationsAfter filling in each step, click on the button at the bottom of the page. Next stepSave the current step and proceed.
2.2 Fill in the basic information
Please fill in the table below:
| Input items | What is it used for? | How should we fill in this field in this example? |
|---|---|---|
| Process Name | Display on the process list and approval page for easy identification of processes. | Two-Step Content Approval (Documentation Example) |
| Process coding | Different processes must be distinguished, and they cannot overlap with existing codes. They cannot be modified after being saved for the first time. | ContentTwoLevelApprovalDoc |
| Category: | Place the process in a specific category for easy retrieval. | Leave the space blank |
| Scope of Initiators | Determine which personnel are authorized to initiate this process. | Select All people |
| Notes/Comments | Indicate the purpose of this process. | The admin creates the content, test performs the first review, and demo performs the second review. |
When "Initiator Scope" is set to "Everyone", there is no need to fill in the scope configuration. In this example, there is no need to create new categories, nor to select departments or roles.
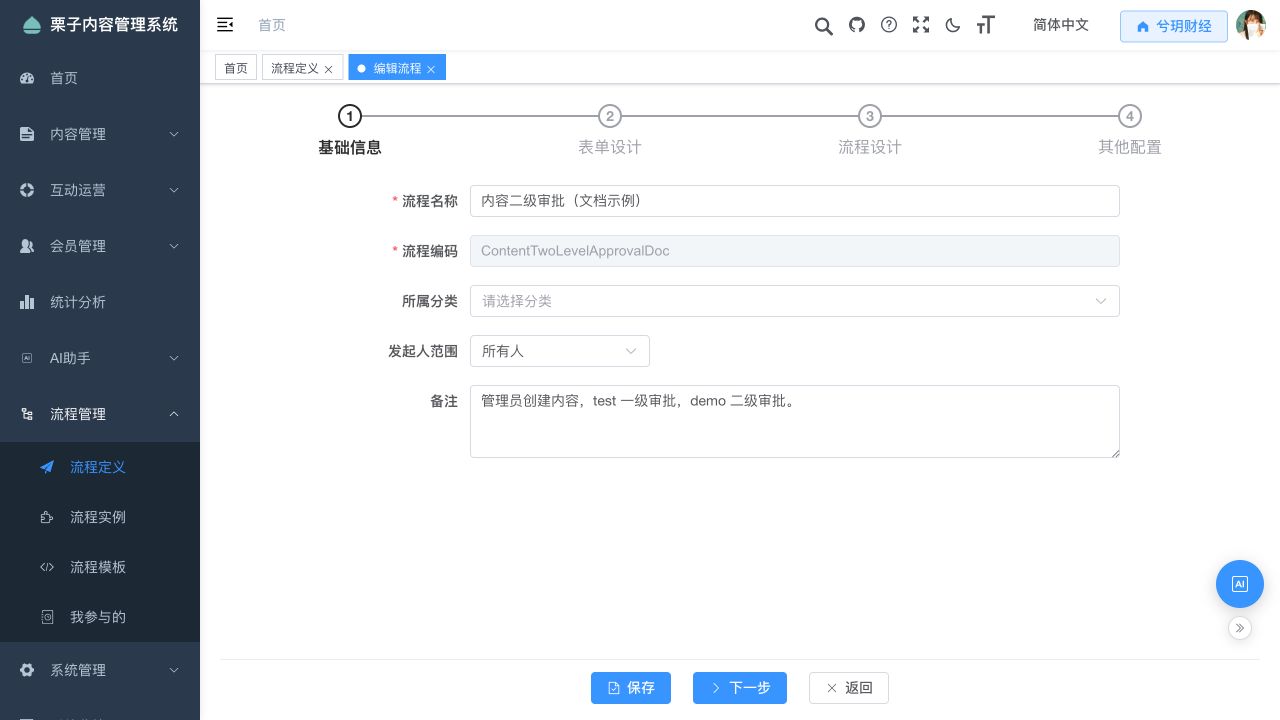
Please click to complete the process. Next step。
Retain the content forms in the templates.
Enter Form design After that, you can see the fields containing the content that has been prepared in the template. In this example…**No need to drag new fields in, nor to fill in test articles in these boxes.**Keep the existing fields and the settings on the right side as they are.
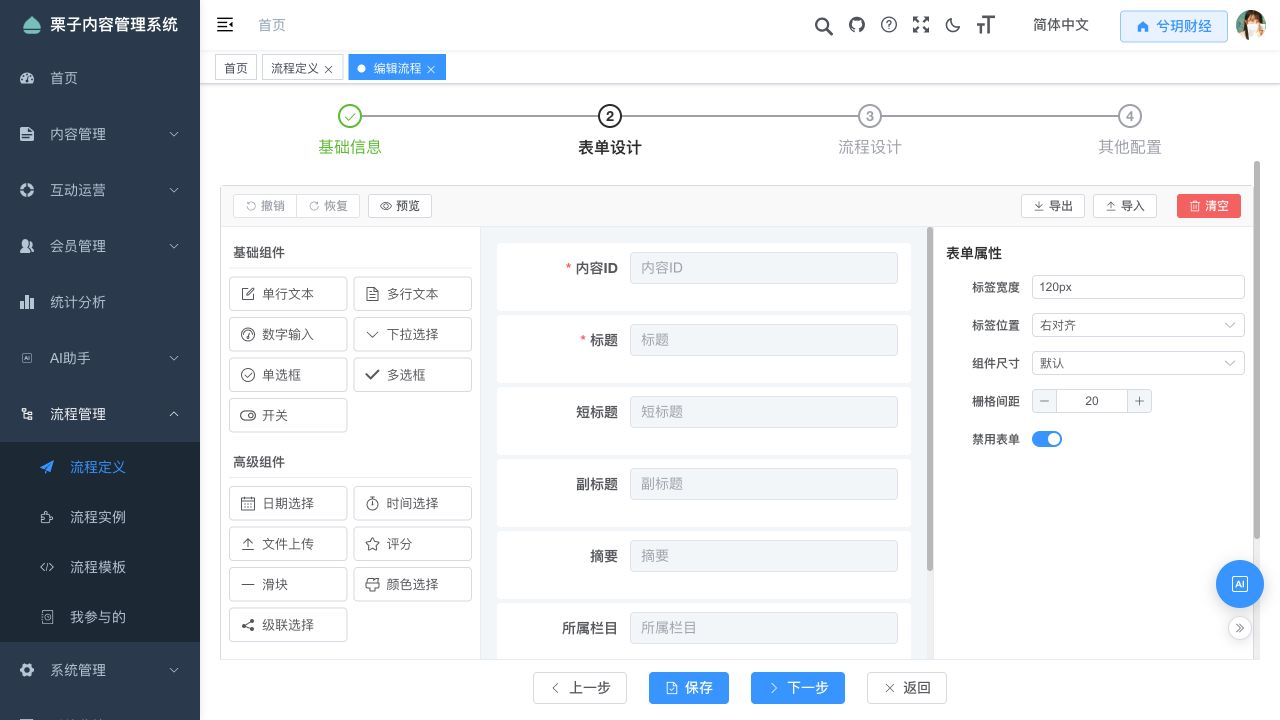
These fields will be displayed to the reviewers after the article submission is reviewed:
| Form Fields | What can the approver see? |
|---|---|
| Content ID | Article number, used to verify whether it is the same article |
| Title | Article Title |
| Short title, Subtitle | Article supplementary title. Display as empty if not filled in. |
| Abstract | Article Summary |
| Associated Categories | The category where the article is located |
| Author / Editor | Author and editor information filled in for the article |
| Keywords, Tags | Keywords and Tags to Be Filled in the Article |
| Source, Source Address | Source article name and original link |
| Preview Address | Open the article preview to view the main content and page effects. |
The "Tag Width", "Tag Position", "Component Size", and "Grid Spacing" on the right are used to adjust the form display effects. In this example, all settings remain at their default values.Disable formsKeep it enabled. Only review the content information during approval processes.
After confirming that the fields are present, click. Next step。
Open the visual process design.
If the page is displayed Advanced BPMN XMLFollow the instructions below. If you have already seen the flowchart indicating “Initiator → Approver → Completion”, then proceed to the next section.
- Click Switch to visual design。
- Click on the prompt to abandon the current design. Confirmed。
- If the prompt "Confirm resetting the current process design" appears again, click. Confirmed。
After completing the process, you should see Initiator → Approver → CompletedThis example is only used in this flowchart.
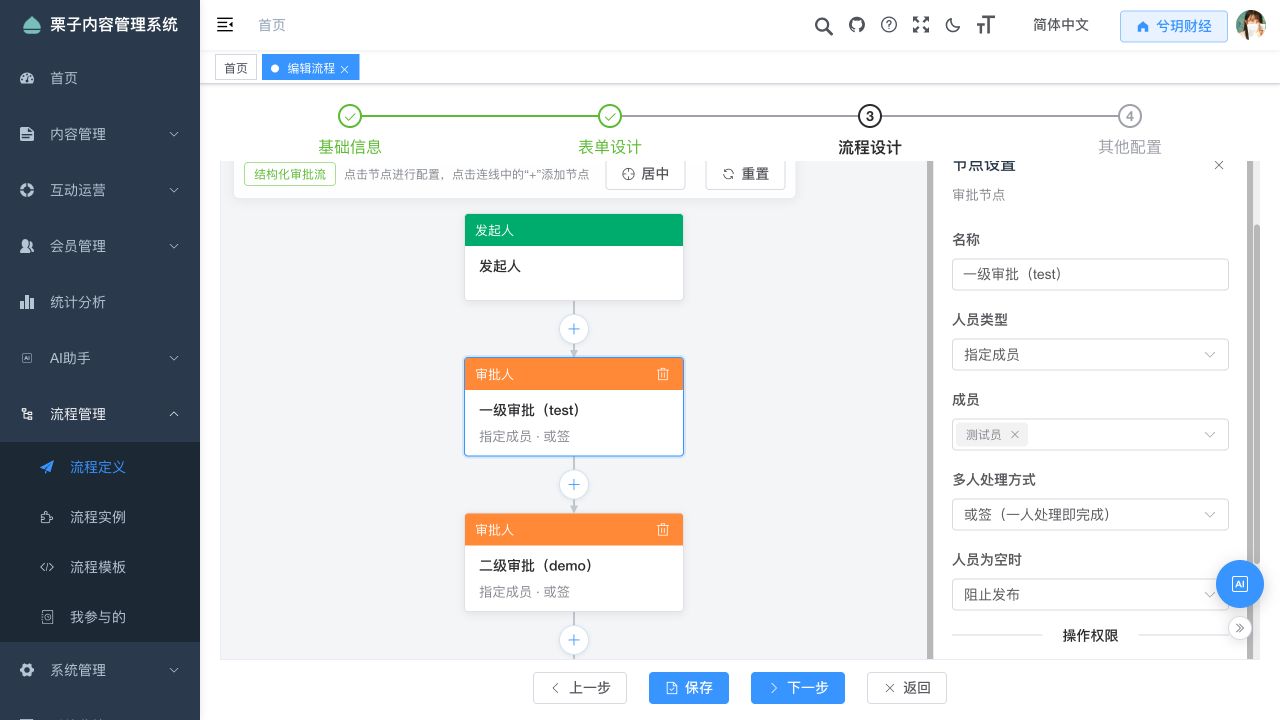
2.5 Setting first-level approval: Hand it over to test
- Click on the orange color in the flowchart. Approver On the right side, you will see “Node Settings”.
- Please fill in the information according to the table below. There are many options on the right side; if you cannot see the options below, scroll down.
| Input items | What is it used for? | How to fill in the first-level approval? |
|---|---|---|
| Name | Step names displayed in the pending and approval history | First Review (test) |
| Person Type | Select approvers by member, role, department, etc. | Designated Members |
| Members | Select the person responsible for approval. You can search for the names of the individuals involved. | Search and select TesterOnly this one person is retained. |
| Multi-person handling methods | Any approver can complete an OR-sign step. An AND-sign step requires approval from everyone. | Or sign (one person can handle it independently) |
| When the personnel field is empty | How to handle the situation when no approver is found | Prevent publicationConfirm that the tester has been selected above. |
| Allow transfer | Allow transferring tasks to other personnel | Do not check this box. |
| Please fill in the comments when agreeing. | Set whether approval comments are required upon acceptance. | Check the box; fill in comments during subsequent approvals. |
| Please fill in your comments when declining. | Whether a reason needs to be provided when setting a refusal | Select; fill in the reason when declining |
After successful selection, the "Members" box should be displayed. Tester。test It is the login account. The person selected in the box shows "tester".
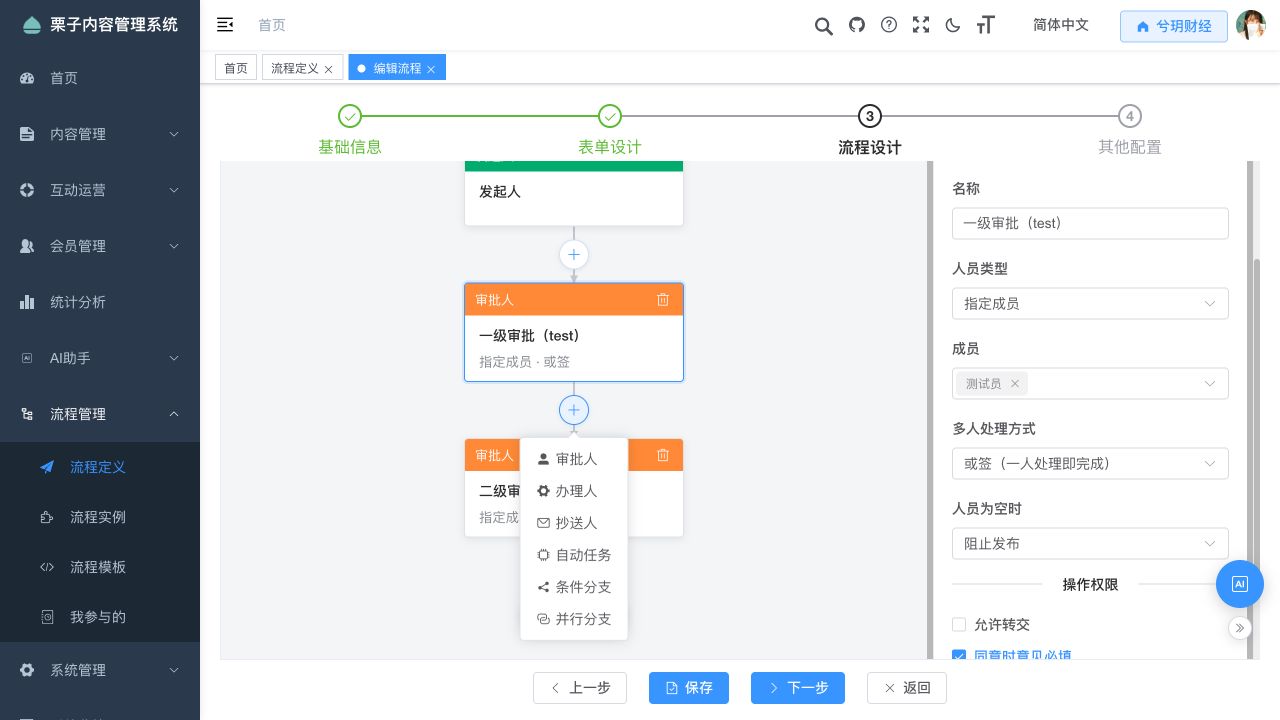
Add secondary approval: assign to demo
- Click Below the first-level approval (test) area, above the end area. Connection in progress +。
- Select from the menu that pops up. Approver。
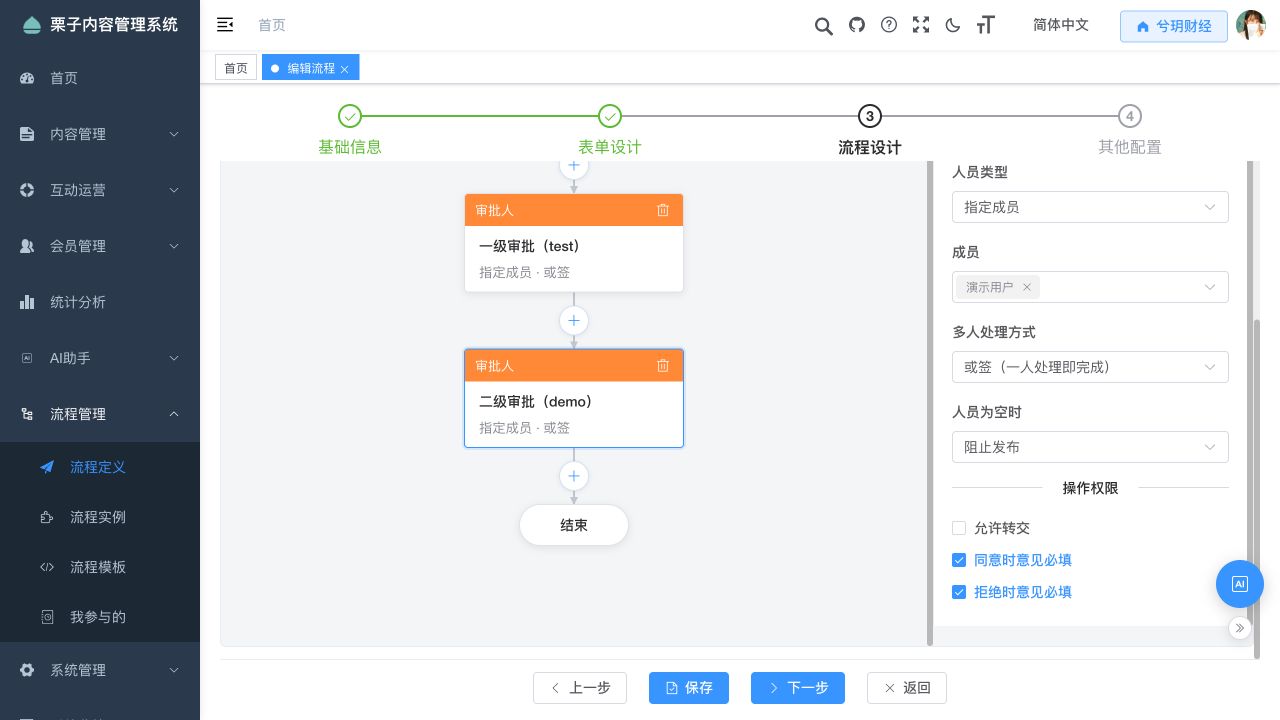
- Click on the newly added approver card.
- Enter the name. Secondary Approval (Demo)。
- Select the type of personnel. Specify members。
- Search for and select members. Demo UserOnly this one person should be kept.
demoThe code identifier, version number, numbers, and original meaning should be retained. It is a login account, and the selection box displays "Demo User". - Other options are the same as those for the first level: Select “Handle individually” or “Prevent publication”. Do not check “Allow transfer”. Make sure both options are selected.
Check the order of steps in the entire process:
Initiator → Level 1 Approval (Test Mode) → Level 2 Approval (Demo Mode) → Completion
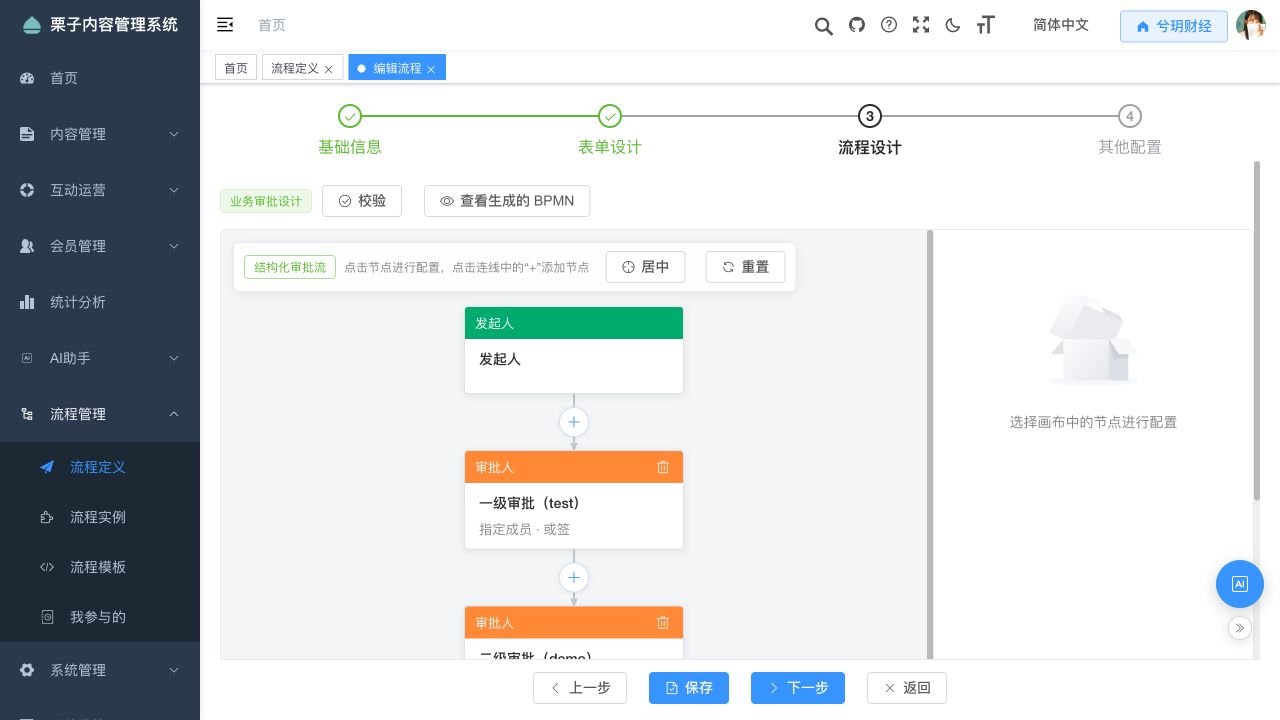
It has been confirmed that there are two independent approval cards. Please select only one approver for each card. Click above to proceed. Verificationseen Process design verification passed. Click below. Next step。
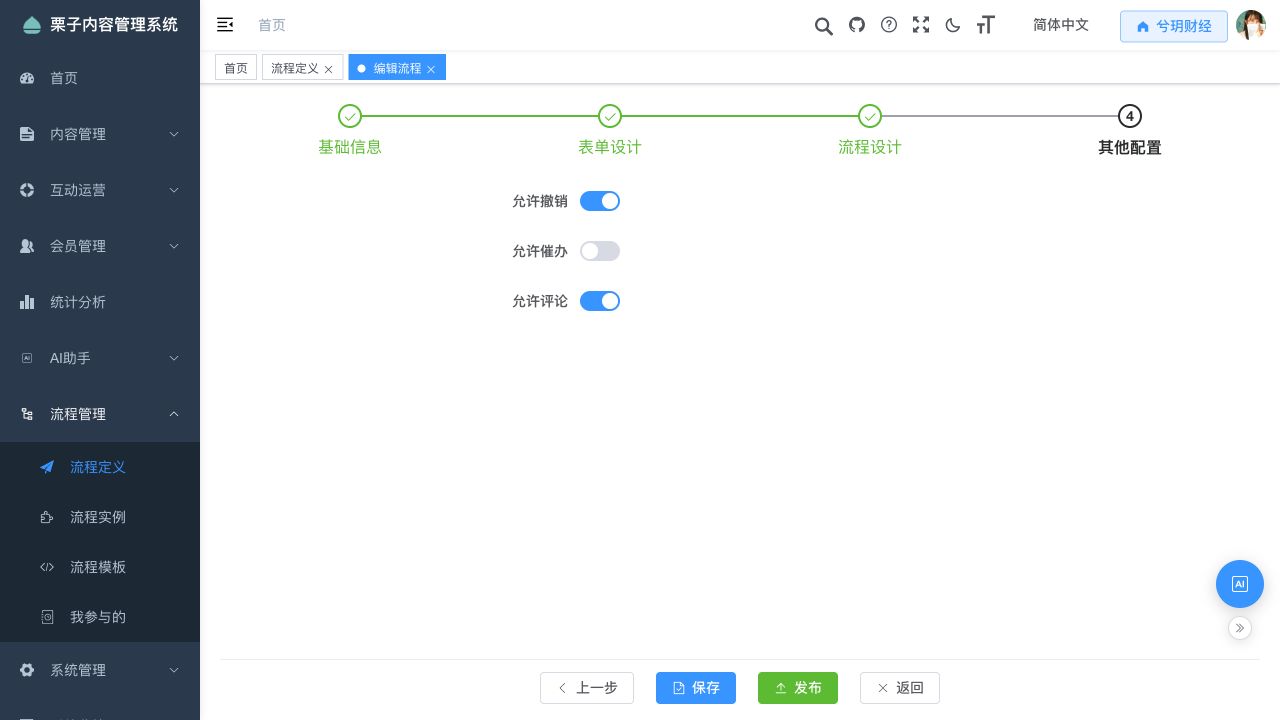
2.7 Set other configurations and publish
| Input items | What is it used for? | Select this example |
|---|---|---|
| Allow for cancellation | The initiator can revoke the application while it is still under approval. | Enable, display in blue color |
| Allowing prioritization | The initiator can request an expedite for ongoing approvals. | Close, displayed in gray color |
| Allow comments | Participants can leave comments in the process details. | Enable; after the process is completed, the administrator will post a demonstration comment. |
- Click below Publish。
- Click in the confirmation box. Confirmed。
- Enter the process name after returning to the process definition list. **Content Level Approval (Document Example)**Click to proceed. Query。
- Confirm the status of this line as PublishedThe first version released is… 1。
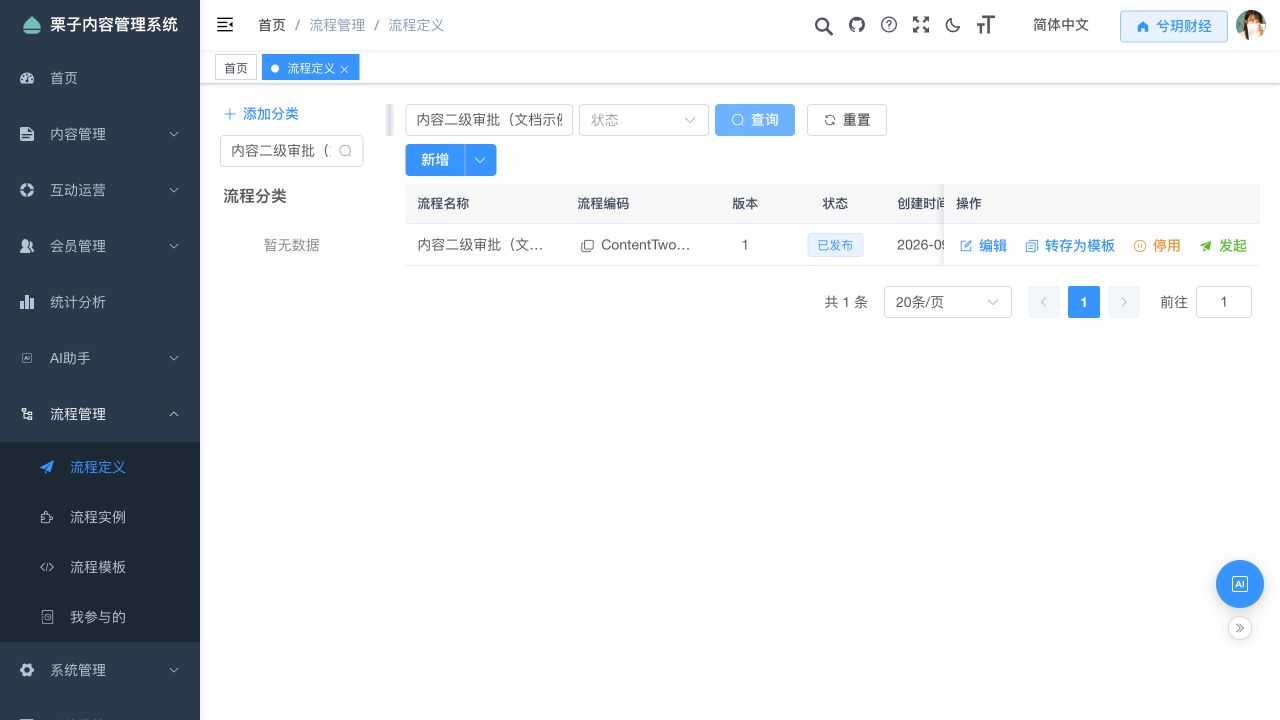
The process definition for creating the content management system has been completed. Next, we need to select the category to which the article belongs.
Create a test category and select the approval process.
Current account: admin. The screenshots in this article are taken from the site. Xi Yue FinancePlease click on the site name in the upper right corner. Then, select “Switch to Current Site” in the window that appears. Xi Yue FinanceThen click again. Confirmed。
Create the "Workflow Testing" category.
- Click on the left side. Content Management System → Category Management。
- Click on the left sidebar tree. 7x24-hour news updates。
- Click above the column tree. Add categories。
- Please fill in the table in the window.
| Input items | What is it used for? | Please fill in this field. |
|---|---|---|
| Parent Category | Decided which new category to place under | 7x24-hour news updates |
| Category Name | Names displayed in the category tree | Workflow Test |
| Category Alias | Identified names of categories | workflow_demo |
| Category path | The access directory used for categories | workflow_demo/ Keep the last slash. |
| Category type | Determine the purpose of each category. | Regular categories |
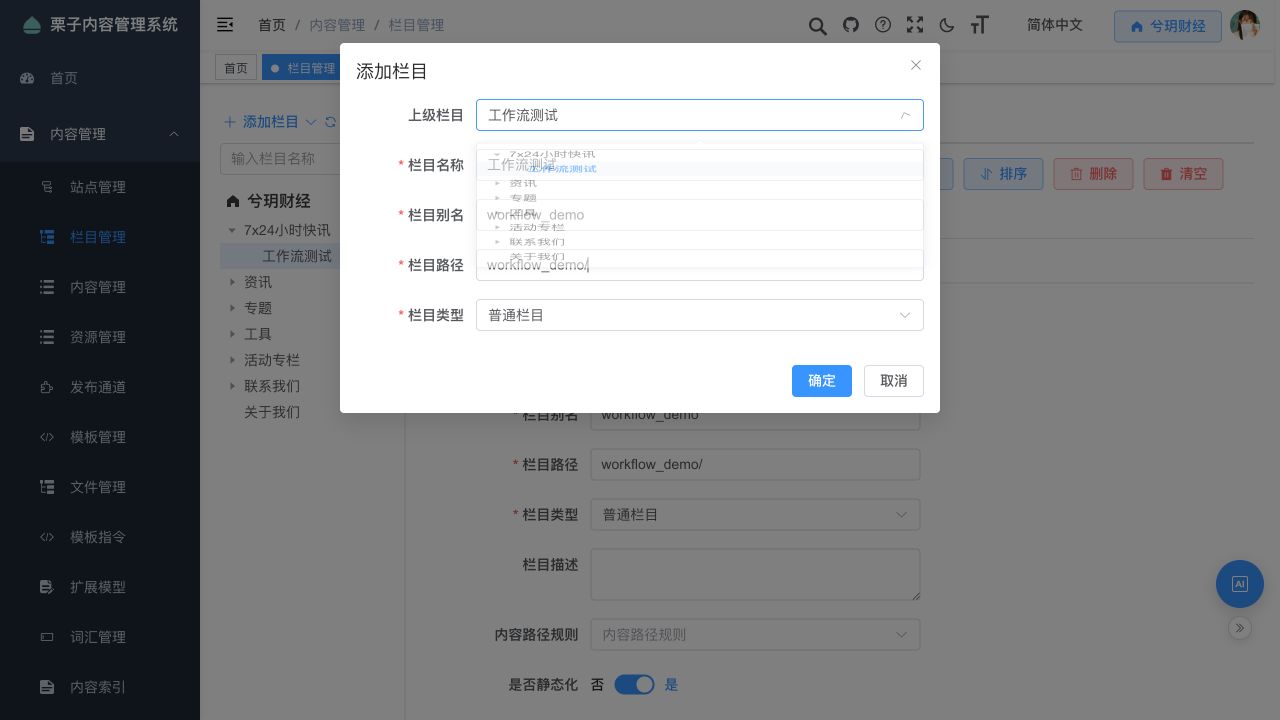
- Click Confirmed。
- Expand 7x24-hour news updatesClick on the newly created item. Workflow testingAll subsequent configurations will be carried out in this sub-section.
If the category already exists and is your practice category, you can directly select it to proceed with the operation.
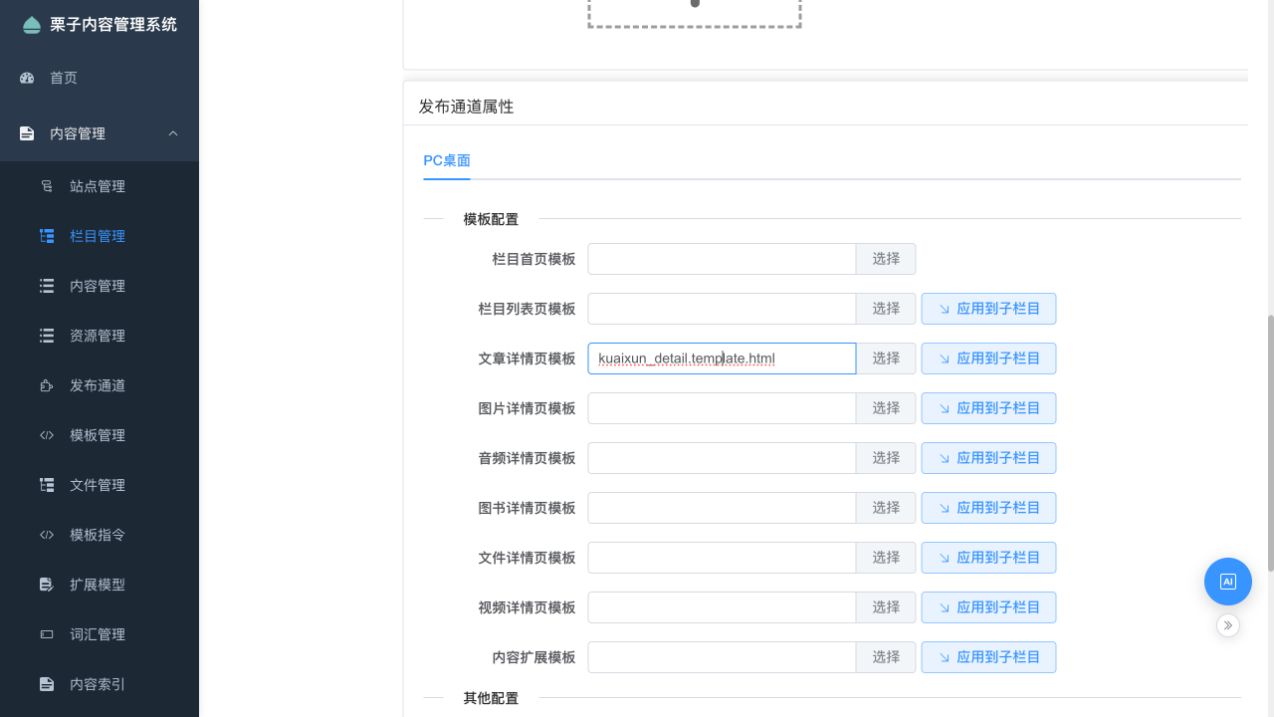
3.2 Configuring Article Preview Templates
- On the right side Basic Information Scroll down to find it. Publish Channel Properties → PC Desktop → Template Configuration。
- In Article Details Page Template Enter the code identifiers, version numbers, digits, and original meanings.
kuaixun_detail.template.htmlThis is the template that is already available for this website, used to display preview images of articles. - All other templates remain unchanged.
- Scroll back to the top of the page and click. Save。
Select a workflow for the category.
- Keep the items selected Workflow testing Categories.
- Click on the right side. Extended configuration。
- Scroll down to Content configurationFind the ChestnutCMS website content management system. Content workflow。
- Select from the dropdown menu. Content Level Approval (Document Example)。
- Scroll back to the top of the page and click. Save。
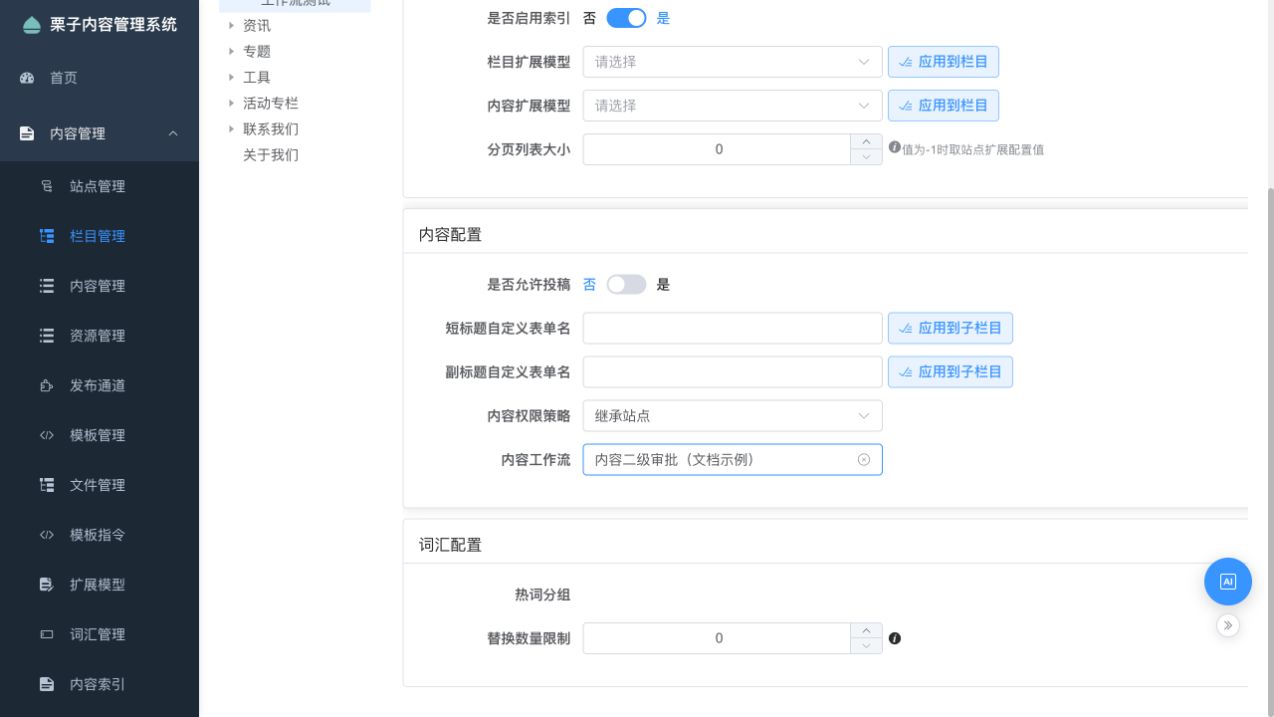
**Results of the examination:**If the "Extended Configuration" section still shows the process you just selected, please revisit that section. If the process is not listed in the dropdown menu, return to the process definition page to ensure that it has been published properly. Then, reopen the column configuration settings.
Create articles and submit them for review.
Add new articles
Current account: admin.
- Click on the left side. Content Management System → ChestnutCMS。
- Expand the left-side category tree. 7x24-hour news updatesClick to proceed. Workflow testing。
- Click on the right side. Added。
- Select the content type. ArticlesDocument format selection Rich TextClick to proceed. Confirmed。
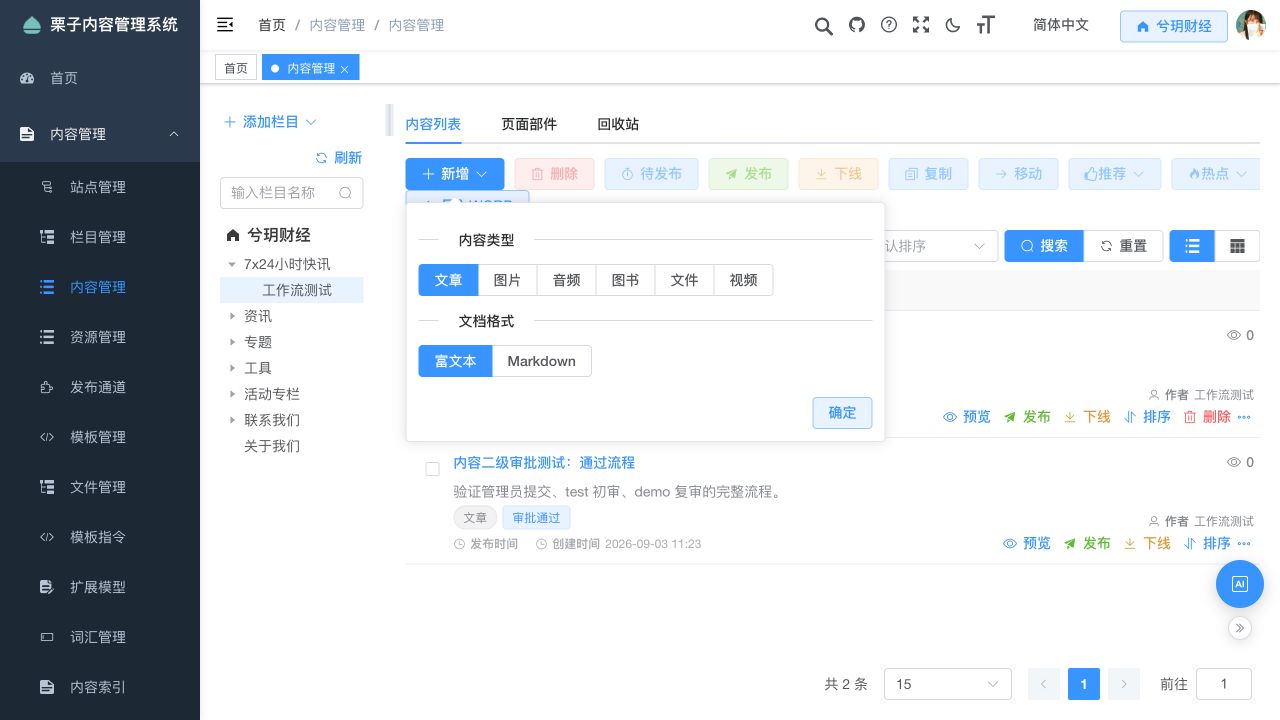
After entering the content editing page, first confirm the right side. Basic Properties → Categories Display Workflow testing。
Fill in the article and save.
| Input items | What is it used for? | Please fill in this field. |
|---|---|---|
| Title | Mark the articles for this test. Refer to these articles during approval process. | Two-Step Content Approval Test |
| Main Text | The content that the reviewer needs to review. | Copy the text below into the text editing area on the left. |
| Author: | Author Information of Articles | Workflow Test |
| Abstract | Summary of content for review by approvers | Verify the full workflow from admin submission through the first review by test and the second review by demo. |
| Source | Source of article name | Internal Test |
| Release time | The time displayed on the article page | Select the date and time for this test, for example 2026-09-03 10:00:00 |
Example of the main text:
This article is used to verify the secondary approval process. Administrators create articles and submit them for review. Testers perform the first-level approval steps, while demonstration users carry out the second-level approval steps. After both levels of approval are successful, the article remains in an approved state and will not be published on the website.
Leave the other fields unchanged or empty. These fields include the short title, subtitle, cover image, editor information, tags, keywords, source URL, deactivation time, and independent path. There is no need to access the “Link Content” or “Independent Templates” section.
The publication time is located below the basic properties on the right side and requires scrolling down. Click on the time box to select the date and time. Then, click on the time panel. ConfirmedThe article preview for this site requires this value. Filling in this value will not result in the publication of any articles.
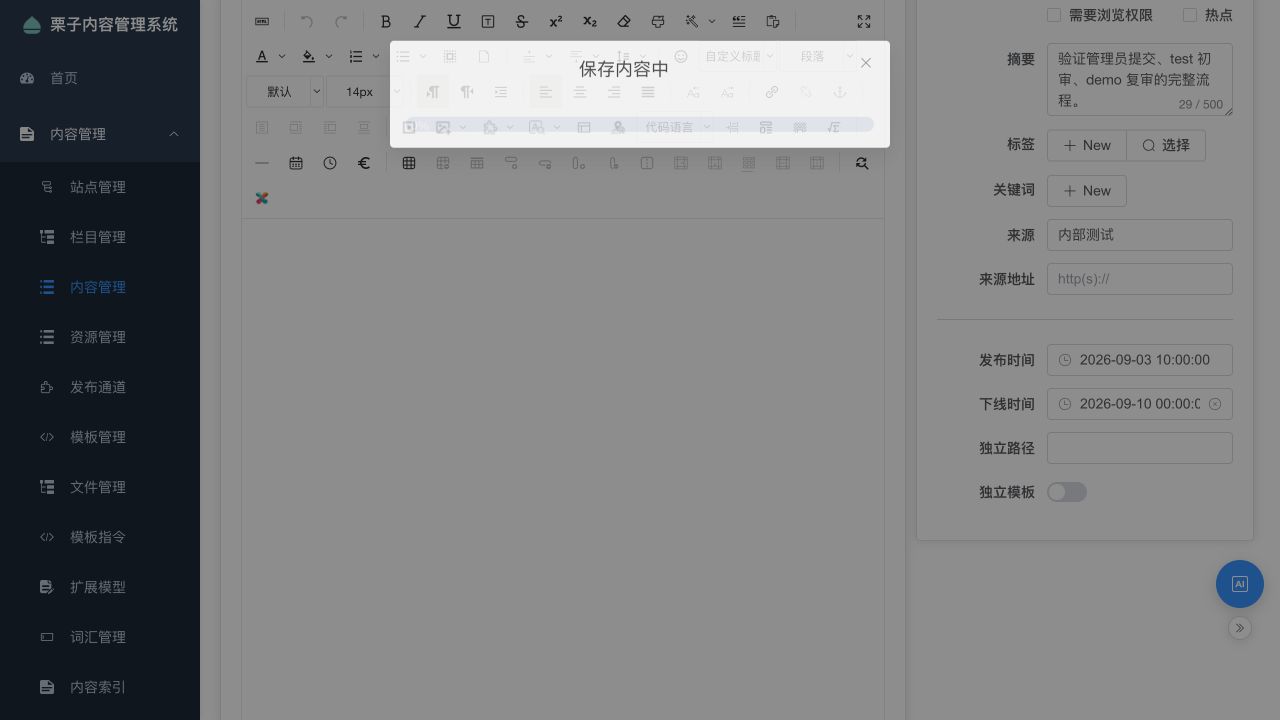
Return to the top of the page, click SaveAfter the saving process is completed, click on the button. PreviewCheck whether the title and content are correct. The preview is usually displayed in a new tab. After reviewing the preview, return to the content editing page.
Submit for review
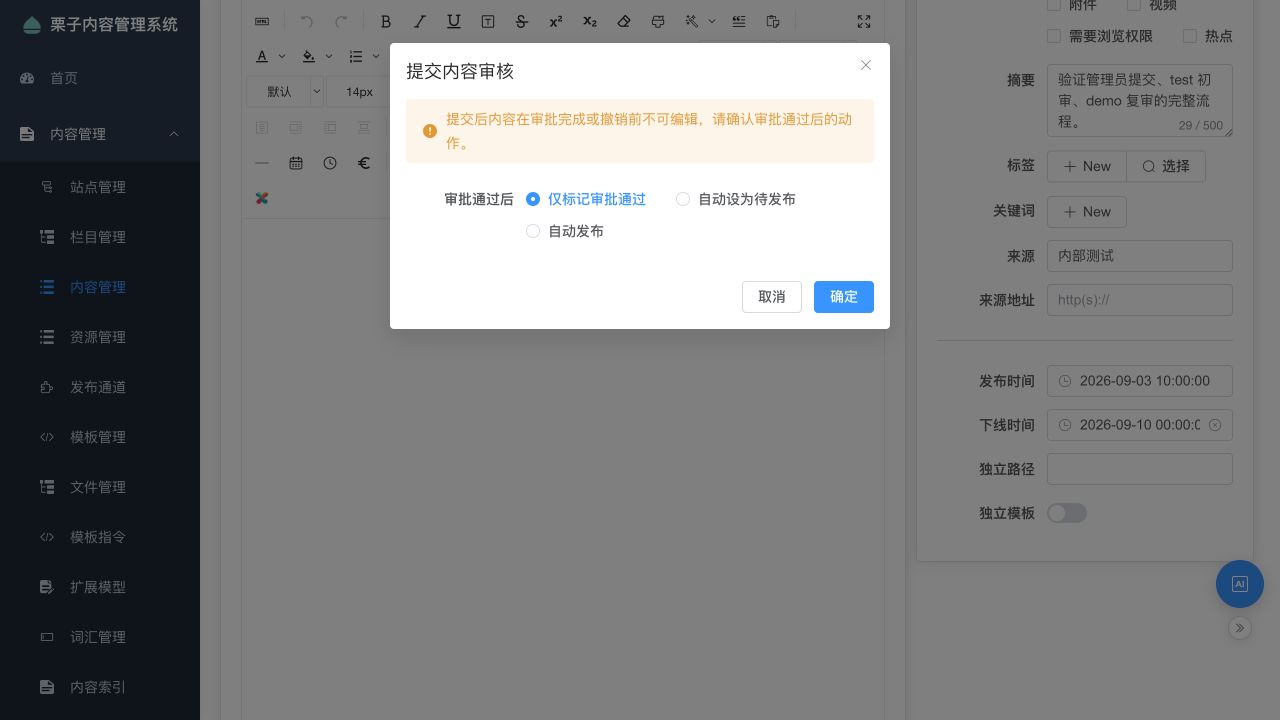
- Click on the top of the content editing page. Submit for review.。
- In the “Submit for Review” window, select “Approved” as Only those that have been approved are marked accordingly.。
- Click Confirmed。
| "Approved" option | Actions taken after both levels of approval are passed |
|---|---|
| Marked as approved | Mark the article as approved. Whether it will be published later depends on the administrator's decision.Choose this example. |
| Automatically set to publish | Automatically mark articles for publication, and then publish them later. |
| Automatic publishing | After approval, the publication process is automatically triggered. |
4.4 Confirm that it has been handed over to the test team
After successful submission, check the right side of the content editing page. Process information:
- Status: In the process of transfer。
- The name of the process is **Content Level Approval (Document Example)**The initiator is admin。
- Appeared in the history of circulation **First-level approval (test)**The status is ProcessingThe person who needs to be dealt with is… Tester。
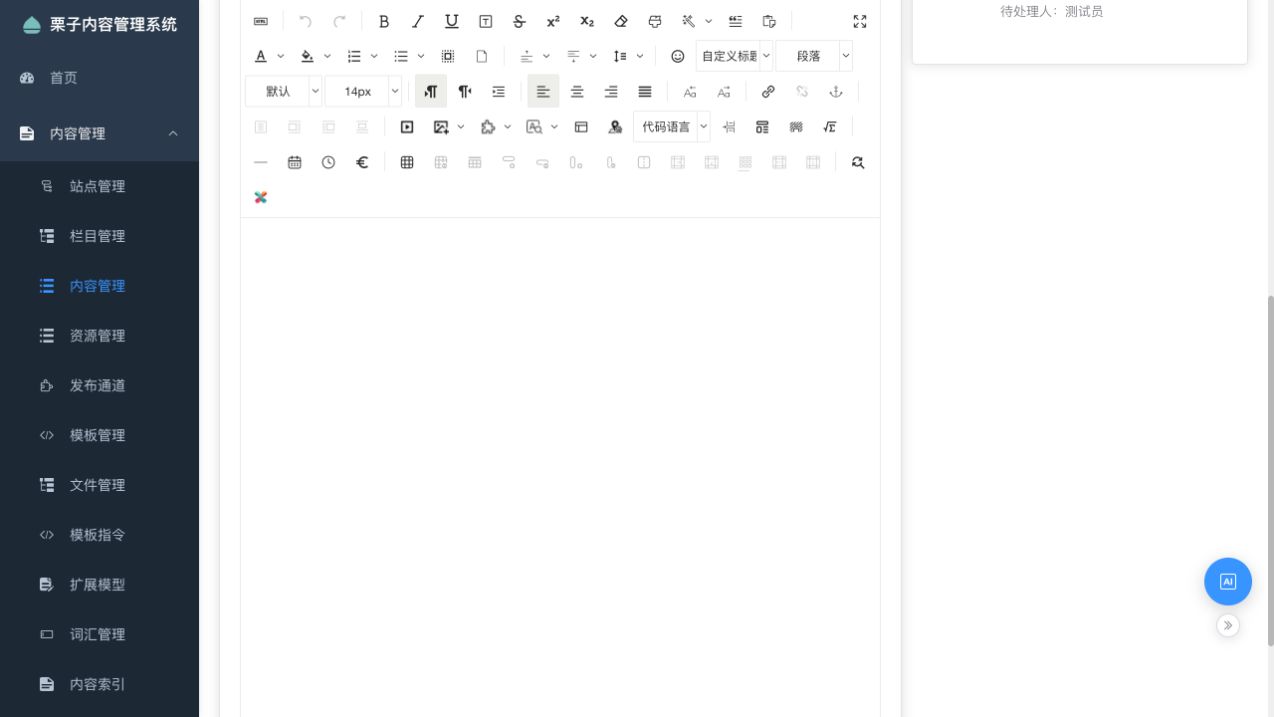
The submission process by the administrator is complete. The approval is in progress, and the article cannot be modified directly. If modification is indeed necessary, the initiator should click on "Process Information". Cancel approvalFollow the prompts to confirm the changes, then edit, save, and submit the document again.
5. Test to complete the first-level approval
Log in to test and open the to-do list.
- Click on the avatar in the upper right corner → Exit login. → Confirmed。
- Use test Log in using the corresponding password, and complete the verification on the page.
- If the test account pops up a security prompt saying "You need to change your password after logging in for the first time or resetting your password," you can click here. Cancel Continue with this exercise.
- Click on the left side. Process management → I participated in。
- Click To-Do ListChoose First-level approval (test)。
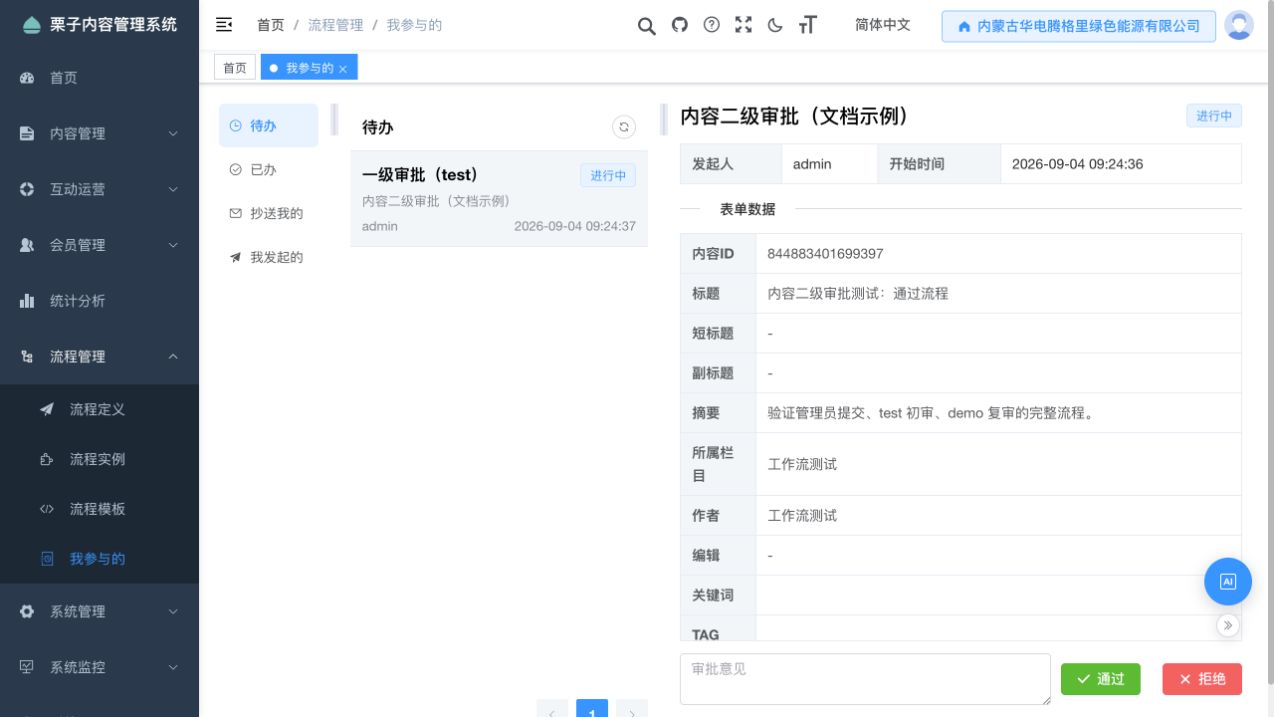
Check the articles and approve them.
- Check the name of the process and the initiator on the right. adminArticle Title Content secondary approval testing: Passed processCategories Workflow testing。
- Scroll down to the details on the right, and find it. Preview AddressClick on the link to view the article text. After viewing, return to the to-do page.
- At the bottom of the page Approval comments Enter the information in the middle:
First review approved. The title, body, and category have been checked. - Click on the green button. Through Button.
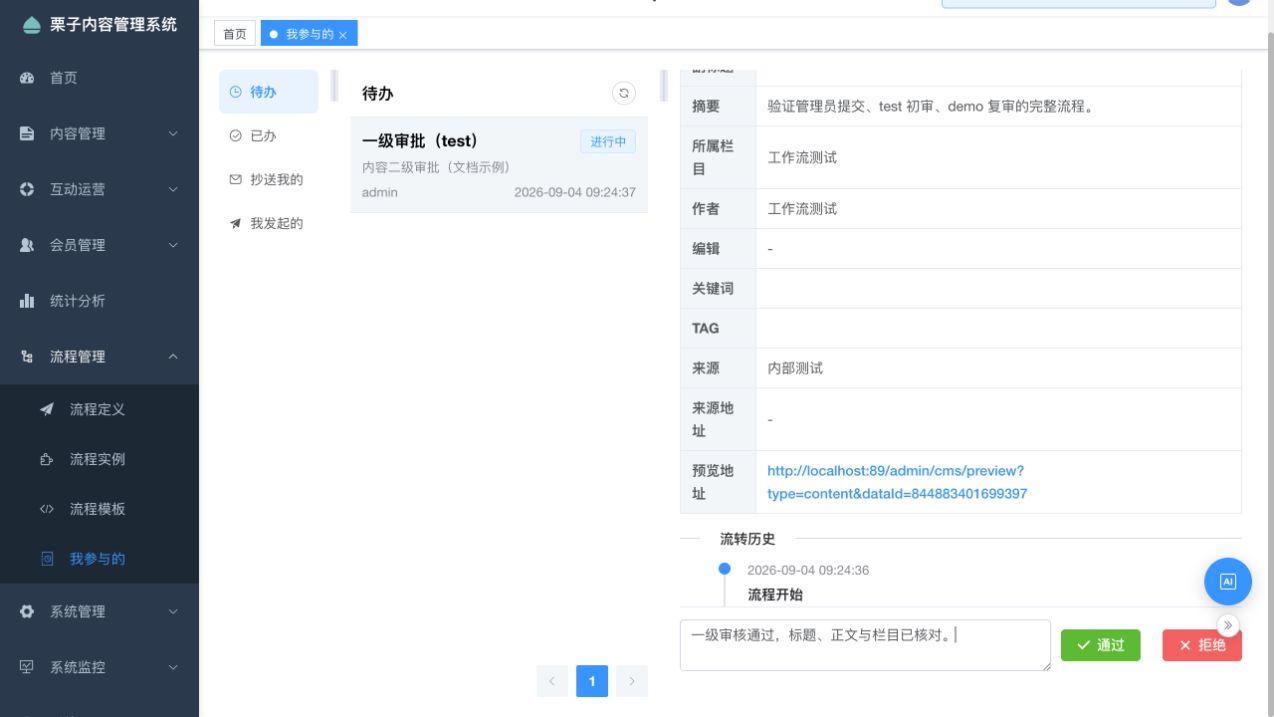
After logging in with your account, the default site in the upper right corner may vary. To handle this task, simply refer to the article title and the category it belongs to on the right side.
Confirm that you have entered the secondary approval process.
After seeing that the processing is successful:
- The first-level task has been removed from the "To Do" list of test.
- Click Already processedSelect the options mentioned earlier. First-level approval (test)。
- View the transfer history: Level 1 display PassedThe person responsible for handling this matter is… TesterAnd display the filled-in information.
- appeared behind **Secondary Approval (Demo)**The status is ProcessingThe person who needs to be dealt with is… Demo User。
After passing the first level of approval, the second-level approval is pending processing by the demo users.](iurl://resources/image/2026/09/04/845217604169797.png?type=resource&id=870680060624965&sid=870679897600069)
At this point, it is still necessary to complete the secondary approval steps through the demo process. The entire process is not yet finished.
6. Demo completion of secondary approval
- Exit the test mode. Use it now. demo Log in using the corresponding password.
- Click Process Management → I Participated In → To-Do。
- Select Secondary Approval (Demo)。
- Please check the article title and its corresponding category, then click on it. Preview Address Review the main text.
- Check the transfer history to confirm that the first-level approval has been completed by Tester Approved.
- At the bottom Approval comments Enter the information in the middle:
Second review approved. Content approval is complete. - Click on the green button. Through Button.
![Fill in the secondary approval comments and get it approved.]](/resources/image/2026/09/04/845217665097797.png)
After successful processing, click. Already processedSelect the options mentioned earlier. **Secondary Approval (Demo)**When scrolling down to view the history, the following elements should be visible at the same time:
- First-level Approval (Test) — ApprovedThere are also the processing times and opinions of the testers involved.
- Second-level approval (demo) — ApprovedThere are demonstrations of the processing time and opinions of users.
- Displayed at the end of the history The process has been completed.。
Both levels of approval have been passed, the process is now complete.](iurl://resources/image/2026/09/04/845217725603909.png?type=resource&id=870680060633157&sid=870679897600069)
7. Administrators view the final results
- Exit the demo mode and use it again. admin Log in.
- Click Process Management → Those I participated in / InitiatedSelect this option. **Content Level Approval (Document Example)**Please verify the article title and the entire approval history.
- Scroll down to Process commentsPlease fill in the following information in the input field:
Workflow demo comment: both reviews are complete. - Click Submit a commentAfter seeing the message “Comment posted successfully”, the comment section should display the username of the commenter, the time at which the comment was posted, as well as the content that was entered earlier.
Commenting process for administrators on ChestnutCMS](iurl://resources/image/2026/09/04/845217794363461.png?type=resource&id=870680060637253&sid=870679897600069)
- To view the article, switch back to the site in the upper right corner. Xi Yue Finance。
- Click Content Management System → ChestnutCMSChoose 7x24 Hour News Updates → Workflow TestingSearch for the article title and open the editing page.
- Click on the right side. Process informationIt should be noted that… ApprovedEnd time, as well as records of the two-level approval process.
After the inspection is completed, this exercise ends. Since the submission was done with the following choices: **Only those that have been approved are marked accordingly.**There is no need to click on “To Be Published” or “Published”.
| Check the location. | Results that should be achieved |
|---|---|
| Tests have been completed. | The first-level approval has been approved. There is a first-level opinion. |
| Completed demos | The secondary approval has been approved. There are secondary opinions. |
| Historical Transactions | Both levels have been passed. At the end, it shows "The process is completed." |
| Comments from the "I Initiated" process by administrators | Display demonstration comments posted by administrators |
| Administrator's article "Process Information" | Display the "Approved" status and end time. |
